This section will walk you through installing the tools necessary to write programs for the Pi Zero.
The first step is to install the Java jdk which can be found here:
http://www.oracle.com/technetwork/java/javase/downloads/jdk8-downloads-2133151.html
Download the Windows version and follow the instructions to install.
Next you need to install Eclipse. I strongly recommend using the Mars 2 version which can be found here. Some newer versions might work, but I believe that the more recent versions will have problems.
Download the Eclipse IDE for Java Developers version. The download will be a zip file. Unzip the file to some location on your computer (e.g. your desktop). Note that these instructions apply to Windows. If you are using a Mac, you can probably still get Eclipse to work but you will have to connect to your robot manually because I am automating the connection with the robot using the windows program PuTTY.
Install the remaining tools by downloading PiRobotTools2021.zip here and unzip the entire folder onto your desktop.

Configuring Putty
Note that this section only applies to Windows. See the Installing Tools for a Mac section below for more details:
You will be programming your robot remotely. That is, you will write your program on your laptop, but you will want to run your program on the robot. To accomplish this we will need to start a ‘remote launcher‘ program running on the Pi which will communicate with your laptop and download and run your program on the Pi.
In order to automate this connection to the Raspberry Pi we will be using a program called PuTTY which we need to configure. Note that PuTTY is only available on Windows so if you are using a Mac, you will need to connect to the Pi manually.
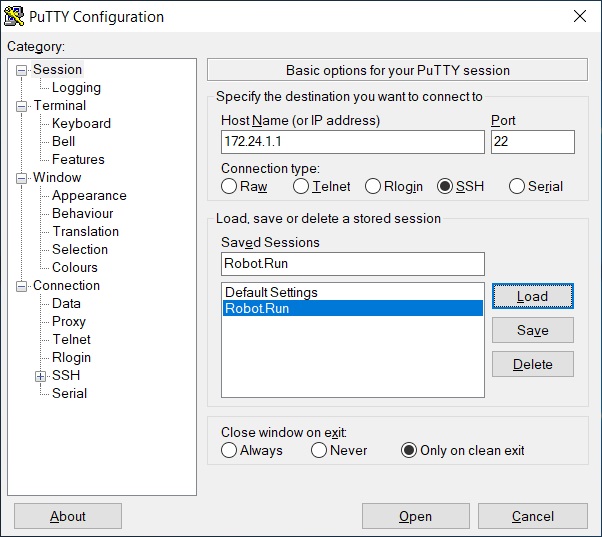
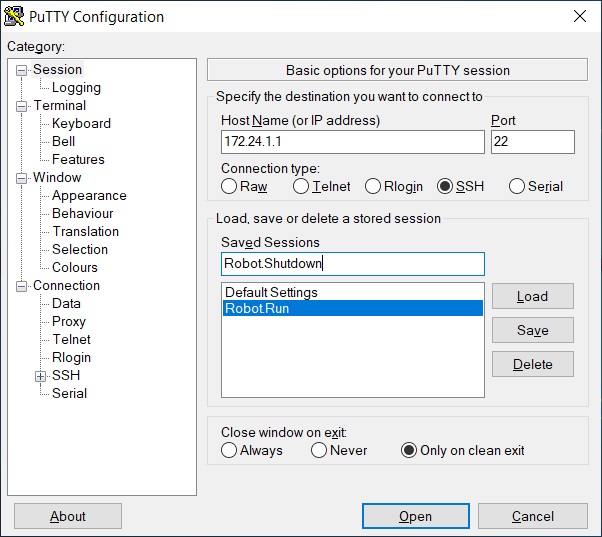
Double click on the putty.exe program that is in the PiUtils folder of your PiRobotTools2021. We need to configure a session for connecting to the robot. In the Host Name (or IP address) field, enter the IP address of the robot, which is 172.24.1.1. Then name this session Robot.Run and click the Save button. The PuTTY configuration window should look like:\
Before we go any further, let’s check to see if we can connect to the robot. First connect your computer to your robot’s WiFi hotspot. The name of your hotspot is printed on your box (e.g. Robot6). The password is ‘raspberry‘.
Give your computer a minute or so to complete the connection and the click the Open button. The following window should be displayed:

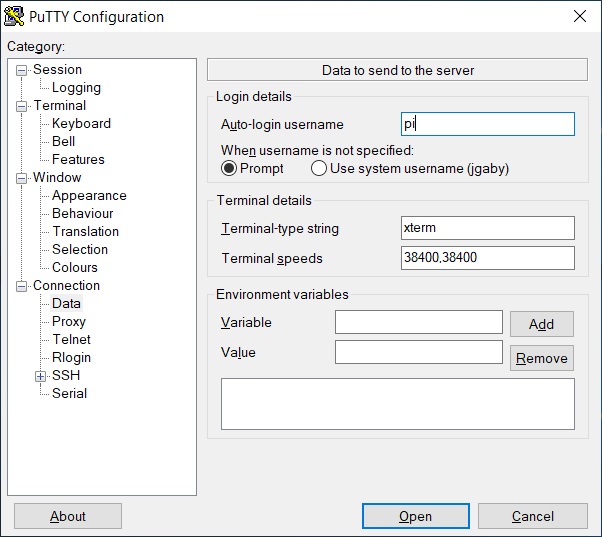
Log in using the user name pi and password raspberry. Once you get this working, close the PuTTY window. We now want to configure the session so that it automatically logs in and starts the remote launcher program on the pi. Once again, double click on the putty.exe program. Then click on the Robot.Run session and click Load. Now click on the Connection/Data option on the left and enter pi in the Auto-login username field like this:
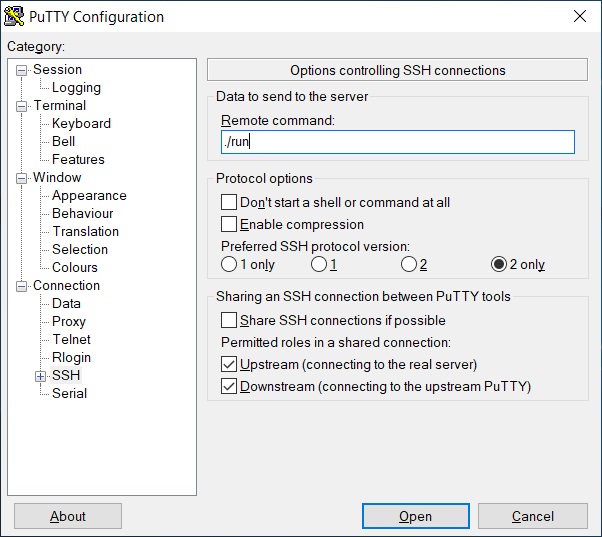
Now click on the Connection/SSH option on the left and enter ./run in the Remote command field, as follows:
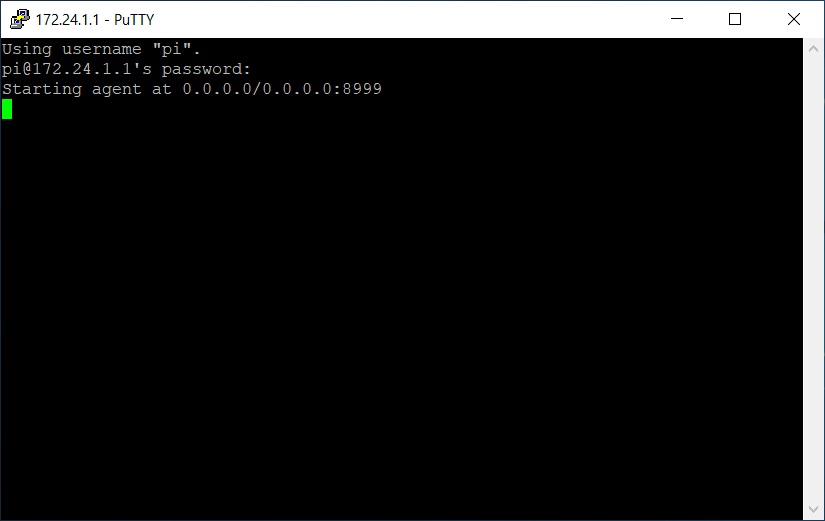
Finally, click on the Session option on the left and then click Save to save this session. Now test this out by clicking the Open button. If everything is set up correctly, the terminal window should open and ask for your password. Enter raspberry as the password, and you should then see the following:
When you have this working, close the PuTTY window.
Now we want to create a second PuTTY session which we can use to shutdown the Pi gracefully. Launch PuTTY again, click on the Robot.Run entry and click Load. Then change the Saved Sessions name to Robot.Shutdown as shown and click Save.
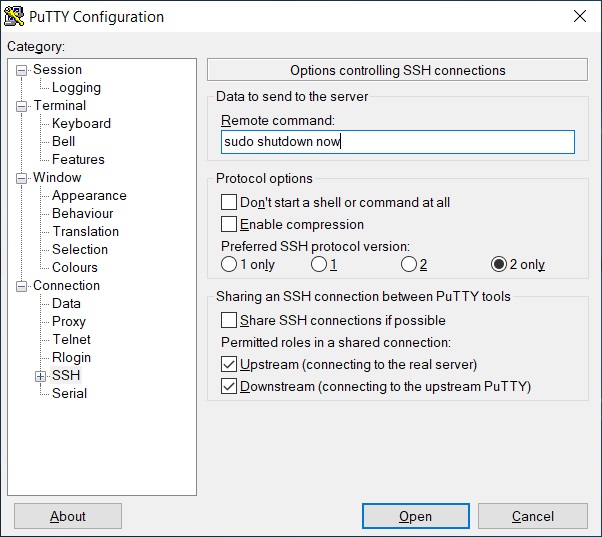
Then click on the SSH Category on the left and change the Remote command field as follows:
Finally, click back on the Session Category and click the Save button and close the PuTTY window.
Running your program
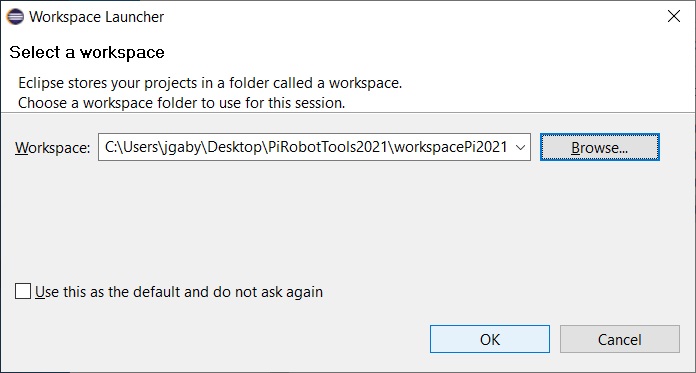
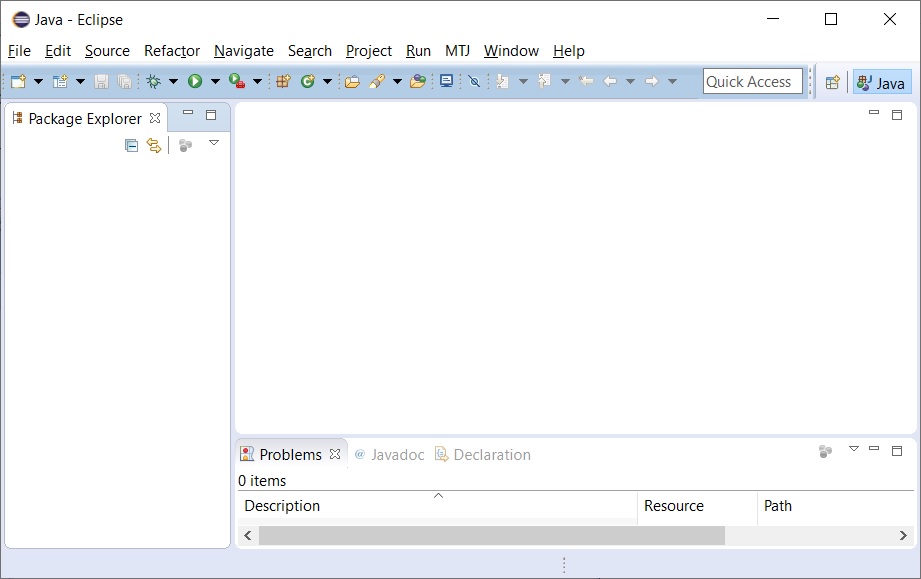
We will be using the program Eclipse to write and run our program. Go to the folder you created when you unzipped your Eclipse download and double click on eclipse.exe. This should open the following window:
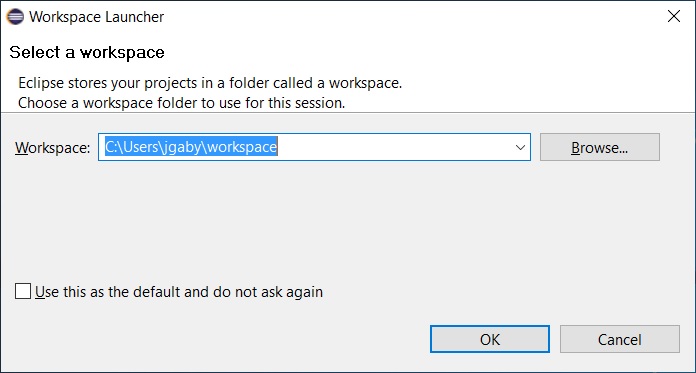
Now click the Browse button and navigate to the workspacePi2021 folder that is in the PiRobotTools2021 that you downloaded previously:
Then click the OK button and the following window should open:
Now run the Driver Station by double clicking on the PiDriverStation.cmd file in the PiUtils folder located in the PiRobotTools2021 that you downloaded earlier. Note that this will only work for Windows, so if you are using a Mac, see the Installing tools for a Mac section below.
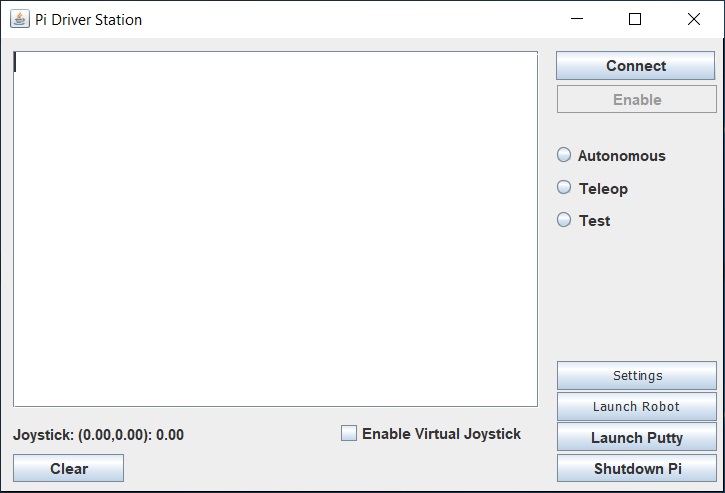
If you don’t have a joystick attached to your computer, you can click the Enable Virtual Joystick checkbox and a panel will open to the right:
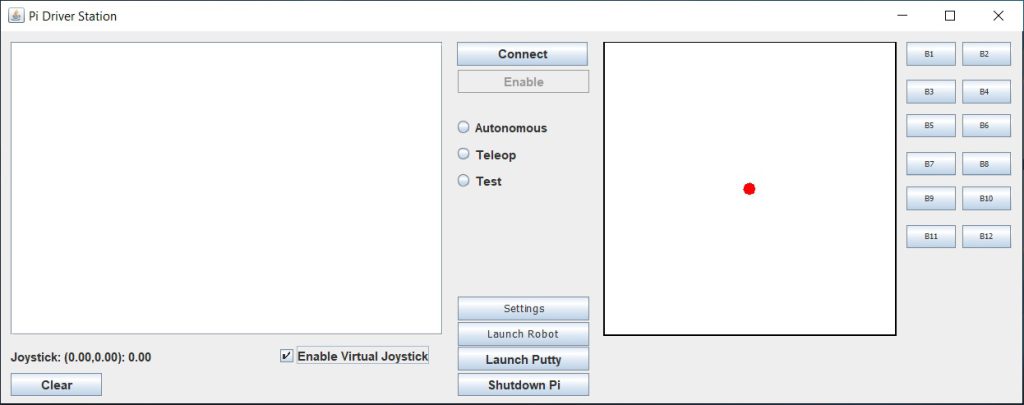
If you click and drag the red dot, it will simulate a joystick control. In addition, the buttons on the right will simulate the buttons on your joystick. Note that if you do wish to attach a joystick, you must connect it to your computer before you open the Driver Station.
Make sure that your WiFi is connected to your robot and then click the Launch Putty button and if you have configured PuTTY correctly, the following window should open:
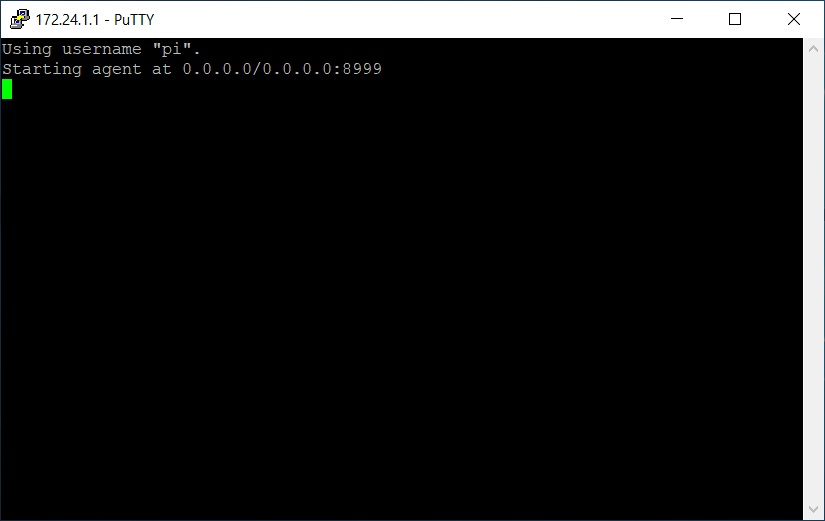
This is the Remote Launcher running. This is the program which runs on the pi and allows your computer to connect and download and run your program. This program must be running in order for anything else to work.
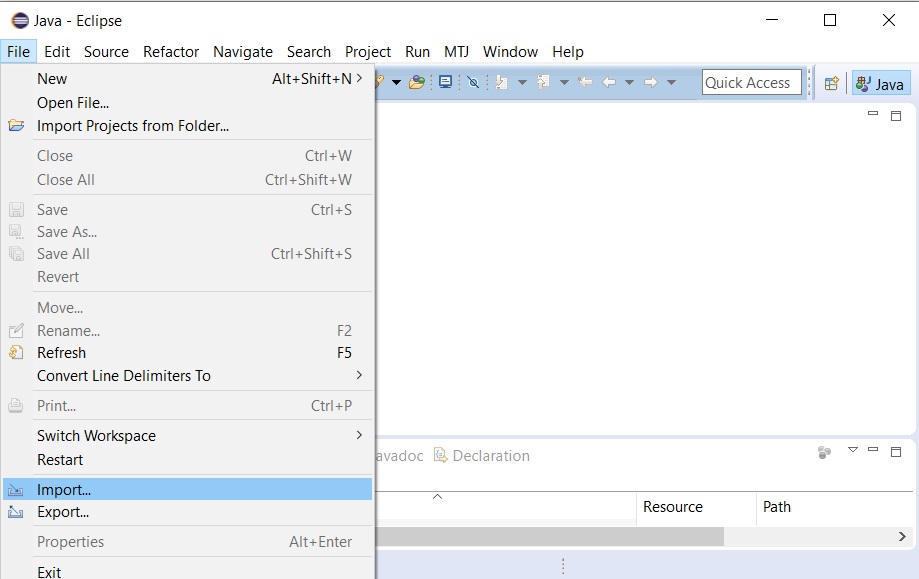
Once this program is running, switch back to Eclipse and choose File/Import:
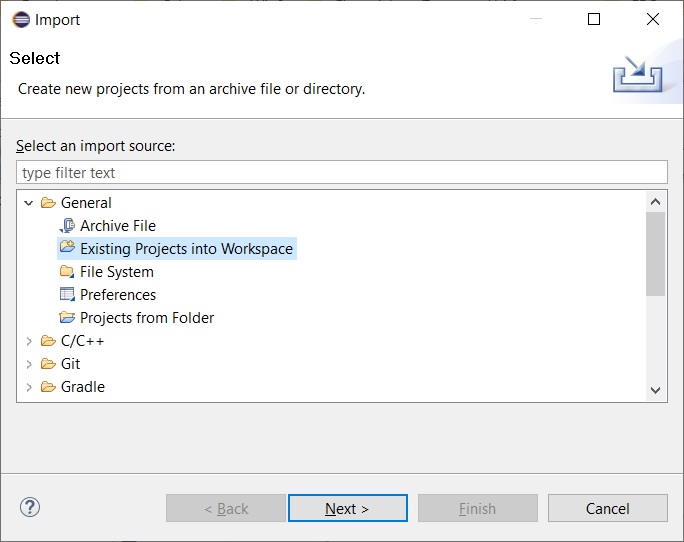
Then select the Existing Projects into Workspace option:
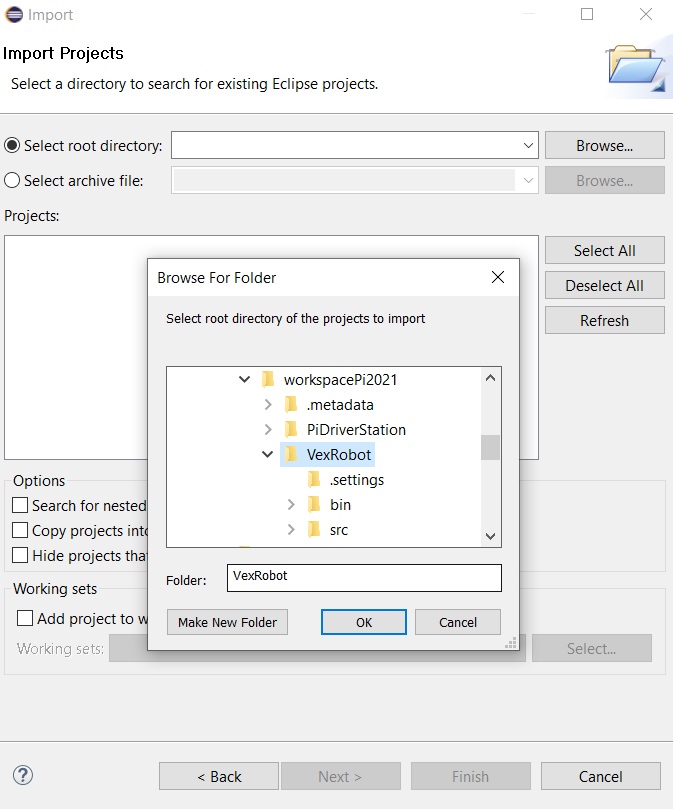
Then in the dialog that appears click the Browse button and choose the VexRobot folder that you will find within the PiRobotTools2021 that you downloaded:
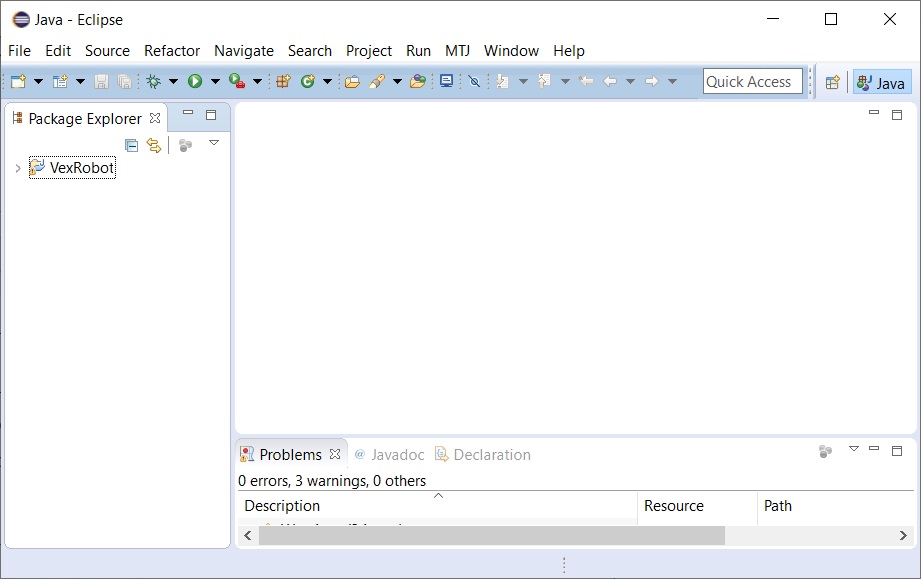
Then click OK and Finish:
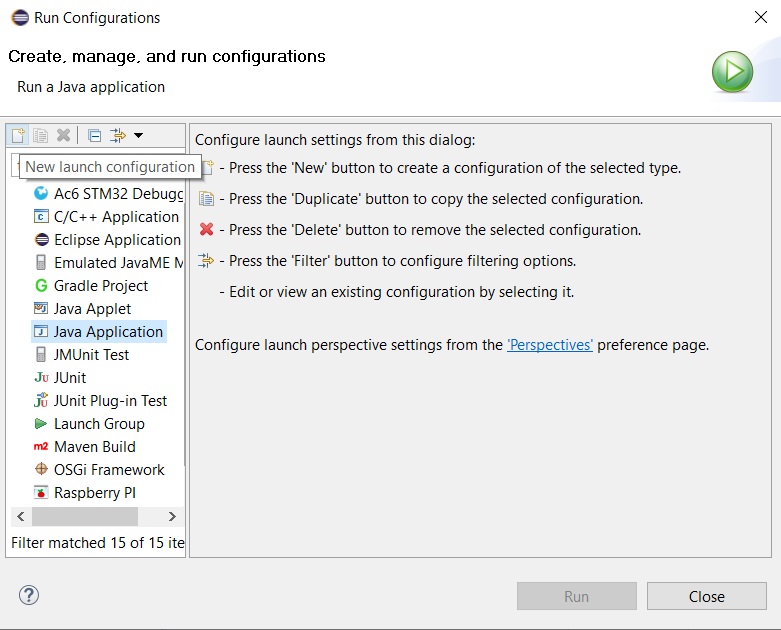
Next we need to create a Run Configuration so that our program will run on the Pi. Click on the dropdown as shown below and choose the Run Configurations option:

Then select Java Application and click on the New launch configuration button in the upper left:
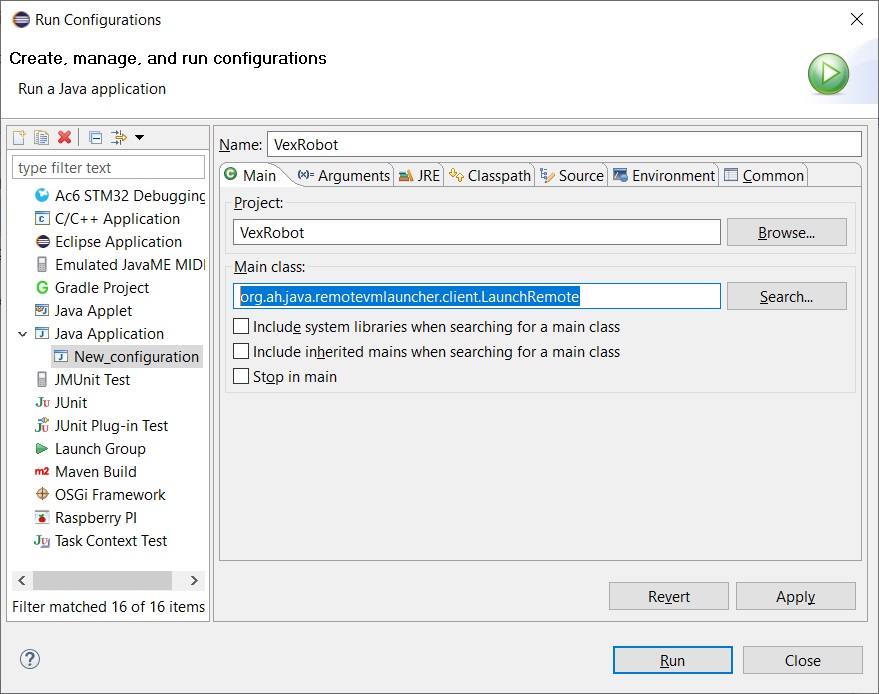
Then in the dialog that appears, change the Name field to VexRobot, set the Project field to VexRobot and the Main class field to org.ah.java.remotevmlauncher.client.LaunchRemote. Note that you can select these values using the Brows button and Search buttons.
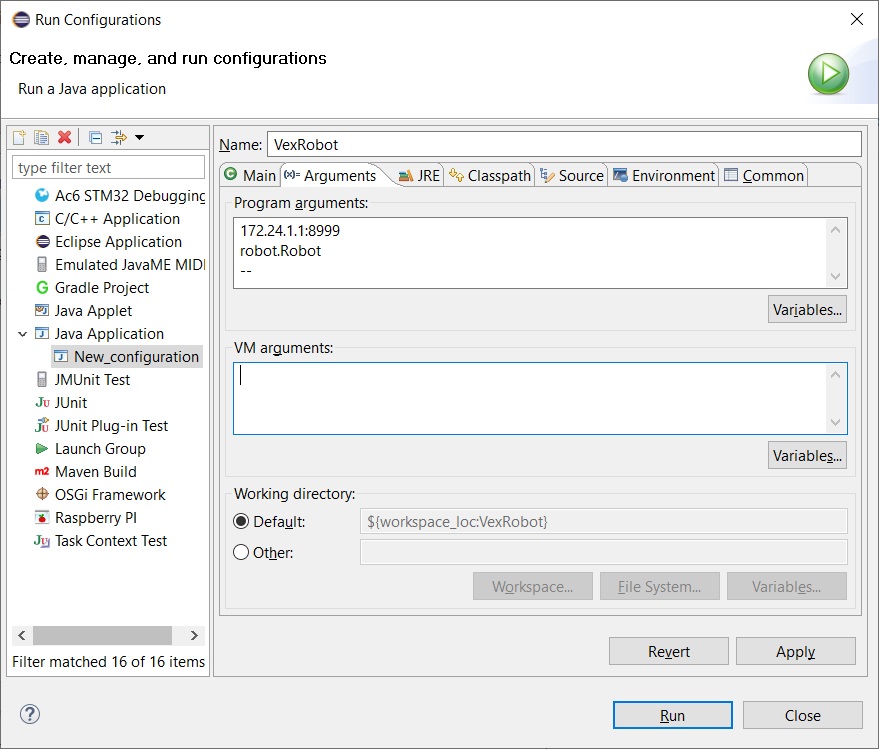
Finally, switch to the Arguments tab and enter the following into the Program arguments field:
|
1 2 3 |
172.24.1.1:8999 robot.Robot -- |
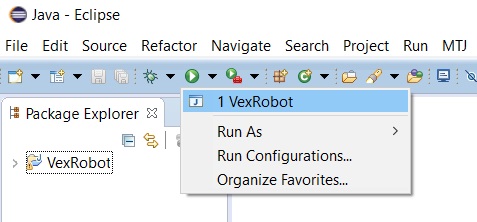
Now click the Run button and your program should then be downloaded and executed on the pi. It can take a little while for this to happen, especially the first time you run your program so be patient. Note that when you want to run the program again, you will be able to simply select your configuration from the Run Configurations dropdown:
When the program is running you should see the following in Eclipse:
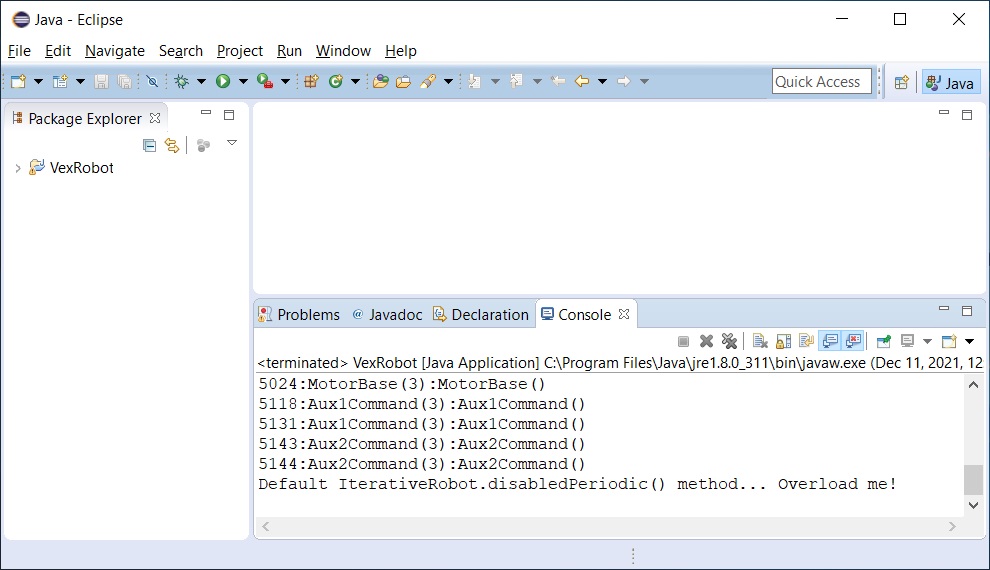
The text you see in the Console window is output from your program and lets you see how it is running. This is very useful for debugging your program if it is not working as you expect.
This program is a template to help you get started with your robot. It is designed so that if you connect your left drive motor to pin 2 and your right drive motor to pin 3 (see below), you will be able to drive your robot with a joystick.
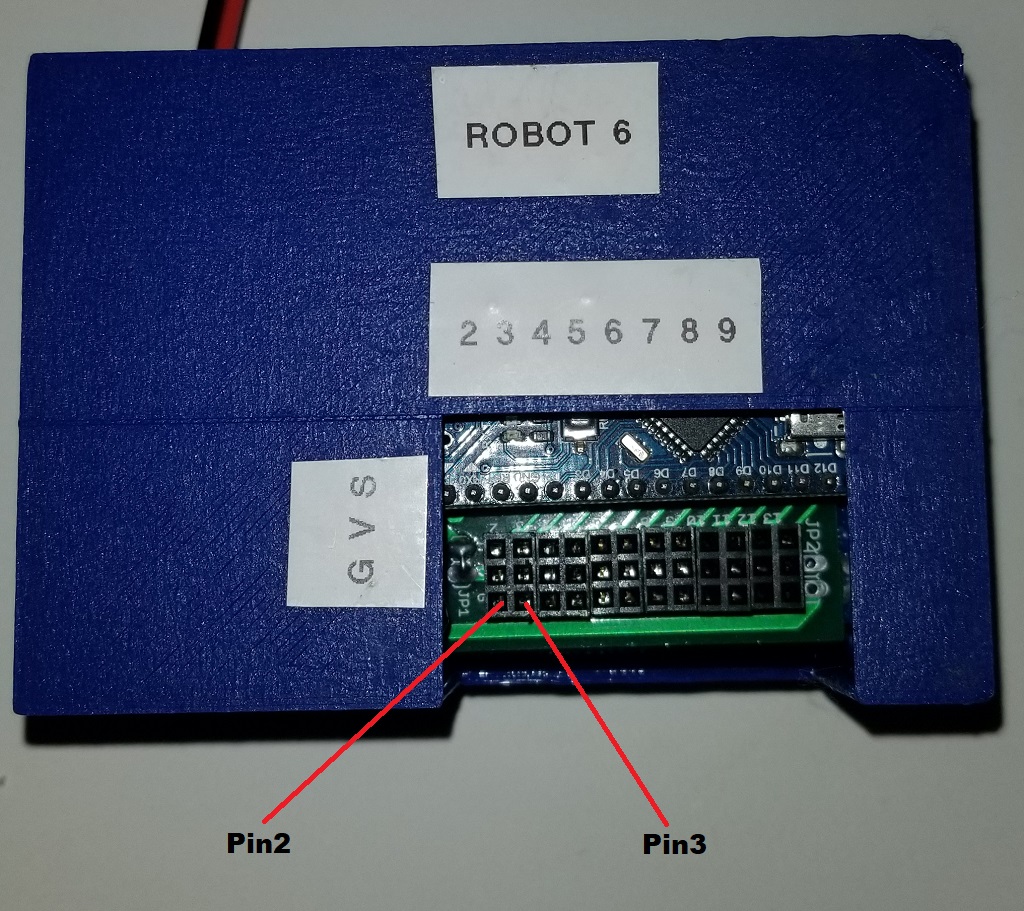
Note that when you connect your motors, the ground (black wire) goes towards the outside.
Once you have your motors connected and your program running, click the Connect and then Enable buttons on the Driver Station:
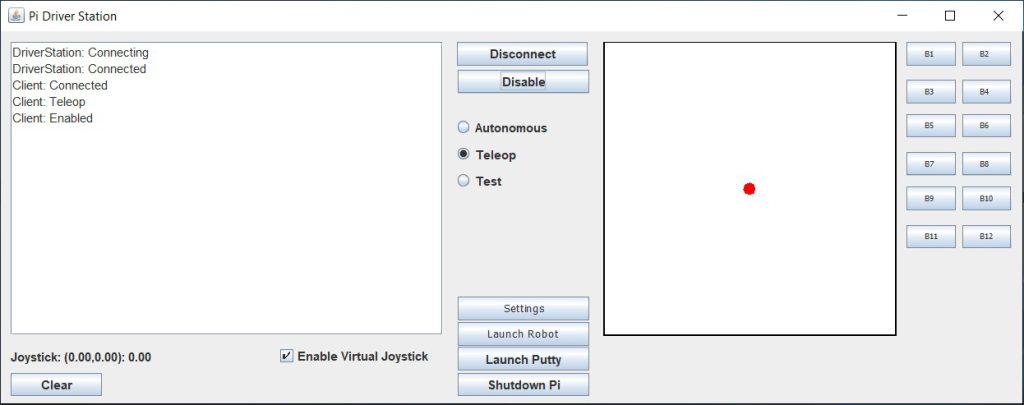
You should now be able to use your joystick to drive your robot.
You may find, however, that it does not run quite right. For example it may drive backwards instead of forwards or not turn in the correct direction.
If pushing the joystick forward causes your robot to drive backwards then you need to change which motor is inverted. We do this in the DriveSubsystem.java file. Switch back to Eclipse and expand the tree on the left and double click on the DriveSubsystem.java file as shown below:
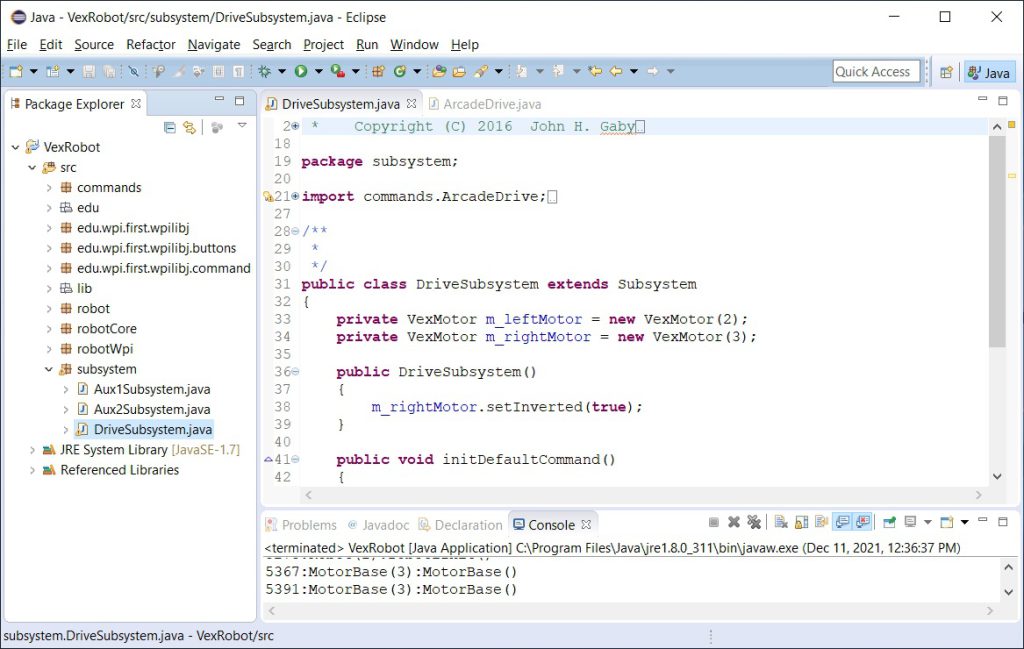
Now when you attach your motors to your robot, typically one of the motors is rotated 180 degrees with respect to the other motor. This means that if you apply the same power to both motors they will rotate in opposite directions. To fix this we invert one of the motors. You can see where this is done in the constructor DriveSubsystem:
|
1 2 3 4 5 |
public DriveSubsystem() { m_rightMotor.setInverted(true); } |
Here we are calling the setInverted function on the right motor. If you find that your robot is driving in the wrong direction you probably need to call setInverted on the left motor instead of the right. If pushing the joystick forward causes your robot to turn in a circle, then you will need to change the inverted status of either the left or right.
Once you have your robot running in the correct direction, you may find that it does not turn in the correct direction. That is, you push the joystick to the right and it turns left. To fix this, expand the commands entry on the left and double click on the ArcadeDrive.java file as shown:
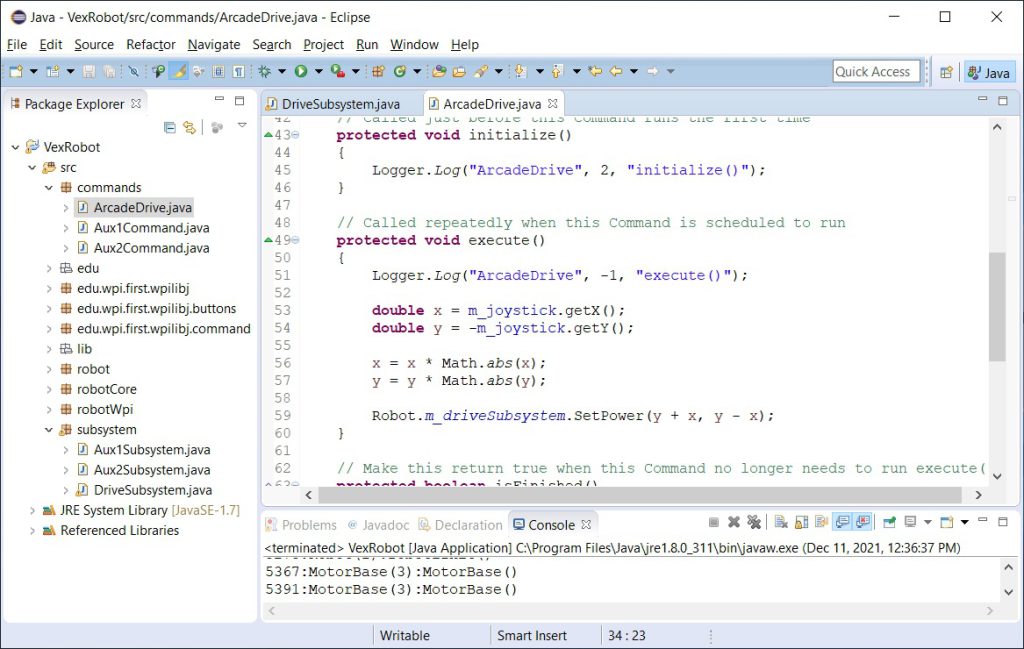
If you scroll down you will find the execute function which controls the behavior of the joystick:
|
1 2 3 4 5 6 7 8 9 10 11 12 13 |
protected void execute() { Logger.Log("ArcadeDrive", -1, "execute()"); double x = m_joystick.getX(); double y = -m_joystick.getY(); x = x * Math.abs(x); y = y * Math.abs(y); Robot.m_driveSubsystem.SetPower(y + x, y - x); } |
To get the robot to turn in the opposite direction you need to change the sign of the x terms in the SetPower call as shown below:
|
1 |
Robot.m_driveSubsystem.SetPower(y - x, y + x); |
Anatomy of your program
In this next section I would like to briefly cover how this program works to better enable you to make your own modifications. The programming language is Java and I do not have the space here to give you a course in Java. If you would like a good Java tutorial, I recommend the following Codecademy course.
The main java file is Robot.java which is where your program starts. There are several functions of note, the first of which is robotInit():
|
1 2 3 4 5 6 7 8 9 10 |
public void robotInit() { Logger.Log("Robot", 2, "robotiInit()"); m_driveSubsystem = new DriveSubsystem(); m_aux1Subsystem = new Aux1Subsystem(); m_aux2Subsystem = new Aux2Subsystem(); m_OI = new OI(); } |
This function is automatically called once the robot is initialized. It is here that we will create the resources that we will need to control the various motors, as well as connect buttons on the joystick to actions we would like to occur.
One thing I would like to point out is the call to Logger.Log(). This outputs logging information to the console which allows you to debug your program. This particular log command simply logs that the robotInit function has been called. If you log various points in your program then if something goes wrong, you can possibly tell where the failure occured.
The next function is teleopInit():
|
1 2 3 4 5 6 |
public void teleopInit() { Logger.ResetElapsedTime(); Logger.Log("Robot", 2, "teleopInit()"); } |
If there is something that you want to do each time you enable your robot, you would place that code here. Once again note the logging call.
The final function that I would like to bring to your attention is teleopPeriodic():
|
1 2 3 4 5 6 7 8 9 |
public void teleopPeriodic() { Logger.Log("Robot", -1, "teleopPeriodic()"); Scheduler.getInstance().run(); Sleep(10); } |
This function will be called repeatedly as long as the robot is enabled. This is the place you should put code that you want to repeatedly execute. Of note here is the call to Scheduler.getInstance().run(). This is a built in function which allows the Command Scheduler to run (more on that later). It is most unlikely that you will not need to add anything to this function.
Subsystems
Subsystems are what we use to control motors. We do this because it allows the reuse of the motors in multiple places without creating conflicts.
To understand how you create a subsystem, lets take a look at DriveSubsystem.java which we will use to control the two drive motors.
The first thing we need to do is create two instances of the class that will be used to control our motors:
|
1 2 3 |
private VexMotor m_leftMotor = new VexMotor(2); private VexMotor m_rightMotor = new VexMotor(3); |
Here we are using the class VexMotor which can control a single servo style PWM motor. We create two instances, one for the left motor and one for the right. The constructor for the class VexMotor takes a single integer which represents the pin number to which the motor is connected. As you can see, we expect the left motor to be attached to pin 2 and the right motor to be attached to pin 3.
The next thing you see is the constructor:
|
1 2 3 4 5 |
public DriveSubsystem() { m_rightMotor.setInverted(true); } |
This function is called once when an instance of this class is created and it is here that we should do any additional initialization that is required. You can see that we are inverting the direction of the right motor to account for the fact that it has been rotated 180 degrees with respect to the left.
The next function:
|
1 2 3 4 5 6 |
public void initDefaultCommand() { Logger.Log("DriveSubsystem", 2, "initDefaultCommand()"); setDefaultCommand(new ArcadeDrive()); } |
This allows us to connect a default command for this subsystem that is to be run automatically whenever another command does not require this subsystem. In this case, we want a command called ArcadeDrive to run which will allow us to control the robot with a joystick. We will cover how these commands work a little later. Note that not all subsystems will have a default command.
Finally the following function:
|
1 2 3 4 5 6 |
public void SetPower(double left, double right) { m_leftMotor.set(left); m_rightMotor.set(right); } |
Allows commands (such as the ArcadeDrive command) to set the power for the left and right motors. The power should be in the range from -1 to 1.
Now in order to use this subsystem, we will need to create an instance of it. We do this in the Robot.java class. The first thing we do is declare a variable to hold the instance:
|
1 2 3 4 |
public class Robot extends IterativeRobot { public static DriveSubsystem m_driveSubsystem; |
Here we have declared m_driveSubsystem as static. This will allow us to access this instance from any of our commands.
Next we need to initialize that variable with an instance of DriveSubsystem which we do in the robotInit() function which we discussed earlier:
|
1 2 3 4 5 6 |
public void robotInit() { Logger.Log("Robot", 2, "robotiInit()"); m_driveSubsystem = new DriveSubsystem(); |
Commands
Commands are what we use to actually do things. First let look at ArcadeDrive.java which is a command we have already touched on.
Since we will be needing the joystick to control the robot, the first thing we do is create an instance of the Joystick class:
|
1 2 |
private Joystick m_joystick = new Joystick(0); |
Next comes the constructor:
|
1 2 3 4 5 6 7 8 |
public ArcadeDrive() { Logger.Log("ArcadeDrive", 3, "ArcadeDrive()"); // Use requires() here to declare subsystem dependencies requires(Robot.m_driveSubsystem); } |
As for all constructors, this will be called when we create an instance of the class and is the place where we should do any required initialization. The important thing to note here is the call to the requires() function. This tells the scheduler that this command requires the use if the DriveSubsystem. Doing this ensures that if we run any other command that also requires this subsystem, then this command will automatically be stopped. This prevents two command from trying to access the drive motors at the same time. Forgetting to add the proper requires calls can lead to some pretty unpredictable results.
The next function:
|
1 2 3 4 5 |
protected void initialize() { Logger.Log("ArcadeDrive", 2, "initialize()"); } |
Is used to do any initialization that is required each time this command is run. For this particular command, no further initialization is necessary.
Then we come to the meat of this particular command:
|
1 2 3 4 5 6 7 8 9 10 11 12 13 |
protected void execute() { Logger.Log("ArcadeDrive", -1, "execute()"); double x = m_joystick.getX(); double y = -m_joystick.getY(); x = x * Math.abs(x); y = y * Math.abs(y); Robot.m_driveSubsystem.SetPower(y + x, y - x); } |
This function will be called repeatedly as long as this command is running. It is here that we read the current state of the joystick and set the motor power for the left and right motors based on its position.
The next function:
|
1 2 3 4 5 6 7 |
protected boolean isFinished() { Logger.Log("ArcadeDrive", -1, "isFinished()"); return (false); } |
Is also called repeatedly as long as the command is running and is used to terminate the command. If this function returns true then the command will end. For this command, we never want it to end so we always return false.
The next function:
|
1 2 3 4 5 |
protected void end() { Logger.Log("ArcadeDrive", 2, "end()"); } |
Is called whenever the command ends normally.
Finally:
|
1 2 3 4 5 |
protected void interrupted() { Logger.Log("ArcadeDrive", 2, "interrupted()"); } |
Is called whenever the command is interrupted. A command will be interrupted whenever another command runs which requires the same subsystem as this command.
Buttons
Now, of course, you will want the robot to do other things than simply drive around, so you will add other motors to your robot and will want to control those motors by pressing buttons on the joystick.
This sample program has an examples of running ‘auxiliary’ motors via a buttons on the joystick. Let’s take a look at one of them to see how it works.
First we create a subsystem in the file Aux1Subsystem.java.
|
1 2 3 4 5 6 7 8 9 10 11 12 13 14 15 16 17 18 19 |
public class Aux1Subsystem extends Subsystem { private VexMotor m_motor = new VexMotor(8); public Aux1Subsystem() { } public void initDefaultCommand() { Logger.Log("Aux1Subsystem", 2, "initDefaultCommand()"); } public void SetPower(double power) { m_motor.set(power); } } |
Looking at this class we see it is very similar to the DriveSubsystem that we covered earlier. The main difference is we only create a instance for one motor (which will be assigned to pin 8), and the SetPower function only takes one parameter to set the power for the single motor. Note also that this Subsystem does not have a default command associated with it.
Now, of course, we must also create an instance of this Subsystem in order to use it which we do in the robot.java file:
|
1 2 3 4 5 6 7 8 9 10 11 12 13 14 |
public class Robot extends IterativeRobot { public static DriveSubsystem m_driveSubsystem; public static Aux1Subsystem m_aux1Subsystem; ... public void robotInit() { Logger.Log("Robot", 2, "robotiInit()"); m_driveSubsystem = new DriveSubsystem(); m_aux1Subsystem = new Aux1Subsystem(); |
To operate this motor via the joystick we must first create a command that will turn the motor on and off. An example of such a command is in the Aux1Command.java file:
|
1 2 3 4 5 6 7 8 9 10 11 12 13 14 15 16 17 18 19 20 21 22 23 24 25 26 27 28 29 30 31 32 33 34 35 36 37 38 39 40 41 42 43 44 45 46 47 48 49 50 51 52 53 54 |
public class Aux1Command extends Command { double m_power = 0; public Aux1Command(double power) { Logger.Log("Aux1Command", 3, "Aux1Command()"); m_power = power; // Use requires() here to declare subsystem dependencies requires(Robot.m_aux1Subsystem); } // Called just before this Command runs the first time protected void initialize() { Logger.Log("Aux1Command", 2, "initialize()"); Robot.m_aux1Subsystem.SetPower(m_power); } // Called repeatedly when this Command is scheduled to run protected void execute() { Logger.Log("Aux1Command", -1, "execute()"); } // Make this return true when this Command no longer needs to run execute() protected boolean isFinished() { Logger.Log("Aux1Command", -1, "isFinished()"); return (false); } // Called once after isFinished returns true protected void end() { Logger.Log("Aux1Command", 2, "end()"); Robot.m_aux1Subsystem.SetPower(0); } // Called when another command which requires one or more of the same // subsystems is scheduled to run protected void interrupted() { Logger.Log("Aux1Command", 2, "interrupted()"); end(); } } |
There are several things to note here. First the constructor for this command contains an argument which specifies the power at which we want to run this motor. This will allow us to use this same command to run the motor at different speeds or directions.
Second, we set the power to the motor in the initialize() function rather than the execute() function like we did in the ArcadeDrive command. This is because the power is constant and it is a waste to set it over and over again.
Finally in the end() function we set the power back to zero so the motor stops. We also call the end() function from within the interrupted() function so no matter how the command ends, the motor will stop.
Finally, we need to connect this command to buttons on the joystick. We do this in the OI.java file:
|
1 2 3 4 5 6 7 8 9 |
public class OI { //// CREATING BUTTONS // One type of button is a joystick button which is any button on a joystick. // You create one by telling it which joystick it's on and which button // number it is. Joystick m_stick = new Joystick(0); Button m_aux1Forward = new JoystickButton(m_stick, 1); Button m_aux1Reverse = new JoystickButton(m_stick, 2); |
Here we have declared two instances of the Button class which correspond to buttons 1 and 2 on the joystick.
Finally we specify what happens when these buttons are pressed:
|
1 2 3 4 5 |
public OI() { m_aux1Forward.whileHeld(new Aux1Command(0.5)); m_aux1Reverse.whileHeld(new Aux1Command(-0.5)); |
Here we are saying that while button 1 is held down, run the Aux1Command with the power set to 0.5 (half speed) and while button 2 is held down, run the Aux1Command with the power set to -0.5 (i.e. in reverse).
There are other options for what to do when a button is pressed. For example you could specify toggleWhenPressed which would cause the motor to turn on the first time you press the button and turn off the next time.
Installing tools for a Mac
If you are using a Mac, you can follow most of the instructions above with a couple of differences. In order to easily follow these directions I strongly suggest you place the PiRobotTools2021 folder that you download on your desktop.
First, to run the Driver Station, you will need to jump through some hoops.
The first thing we need to do is change the permissions of the PiDriveStationOSX.command file so that you can run it. Do do this, open up a terminal window which you can find in your Applications/Utilities folder:
Double clicking on Terminal should open up the following window:
Then type:
|
1 |
cd Desktop/PiRobotTools2021/PiUtils |
Followed by:
|
1 |
chmod 777 PiDriverStationOSX.command |
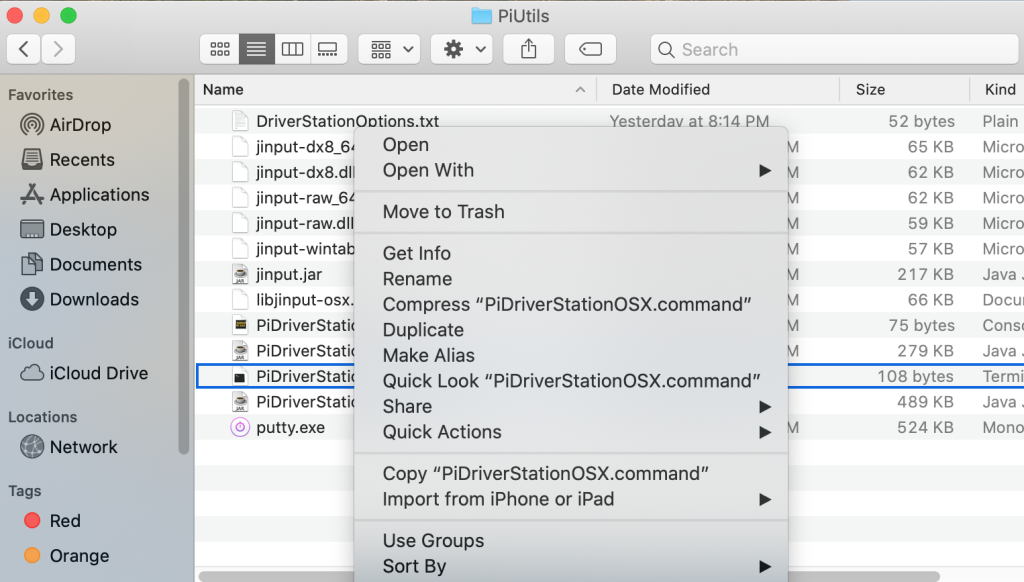
Now, in a Finder window open up the PiUtils folder in the PiRobotTools2021 folder you downloaded (hopefully on your Desktop). Then while holding the control key, click on PiDriverStationOSX.command and then click on Open in the dropdown menu:
The following window should open:
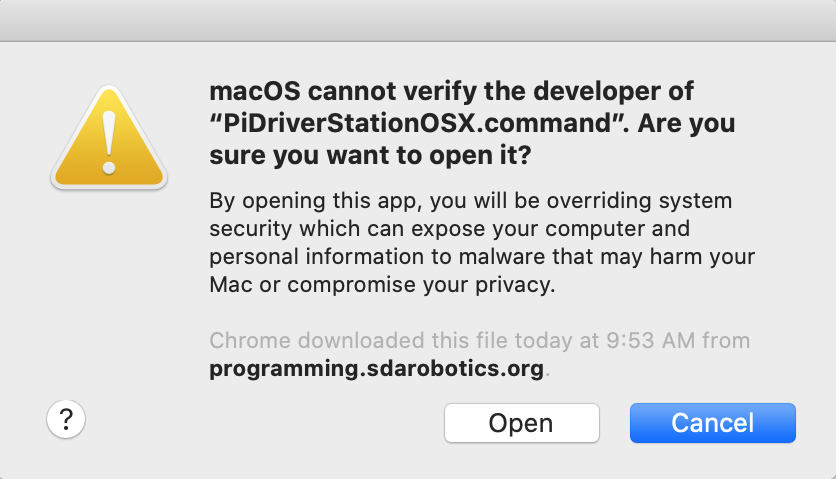
Click the Open button and you should see:
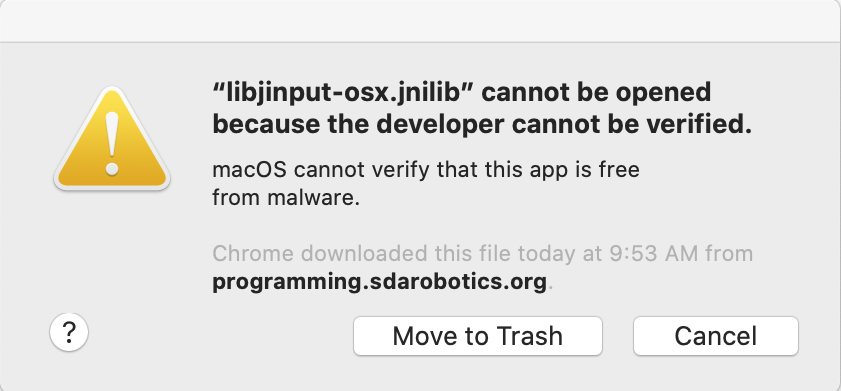
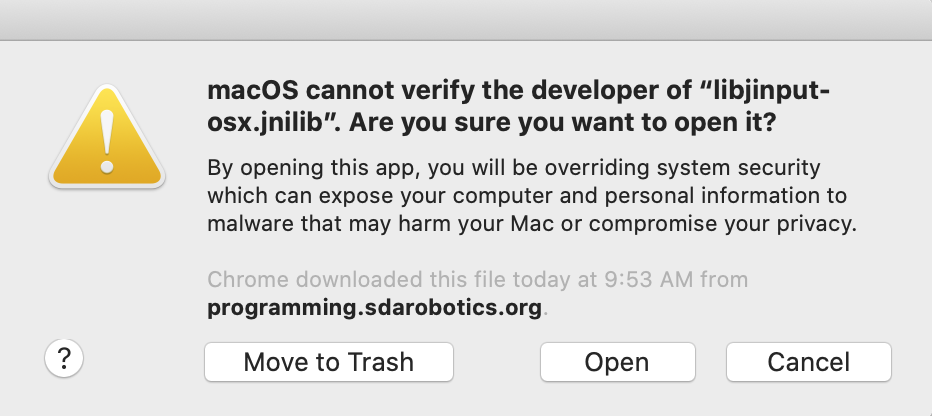
Click on the little question mark and the following window should appear:
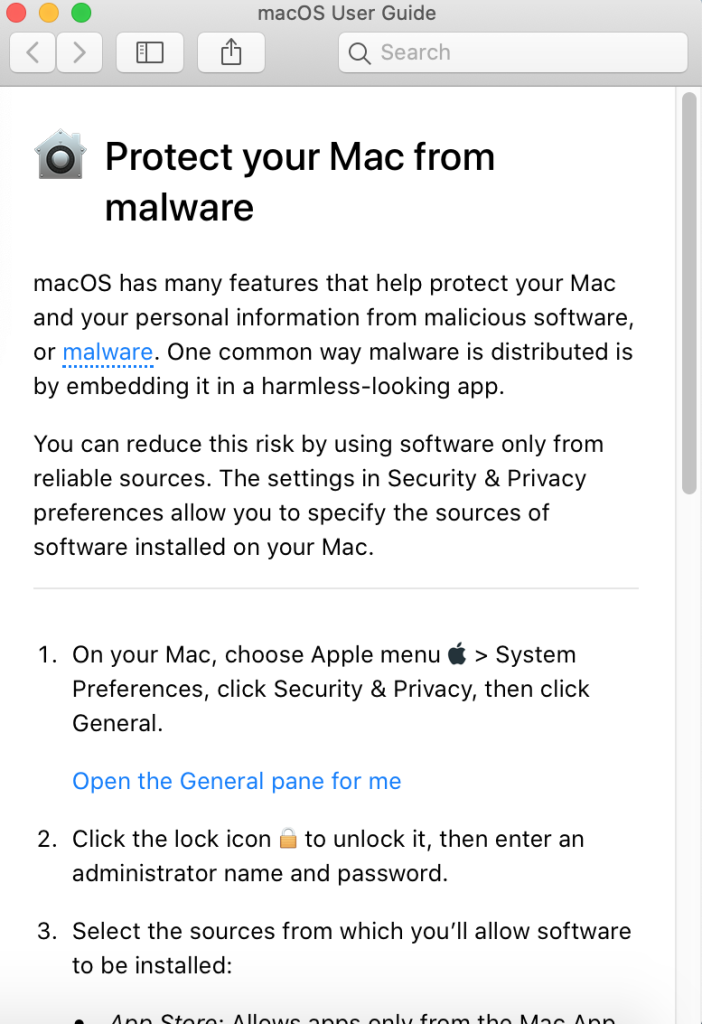
Click on the Open the General pane for me link and you should get the following:
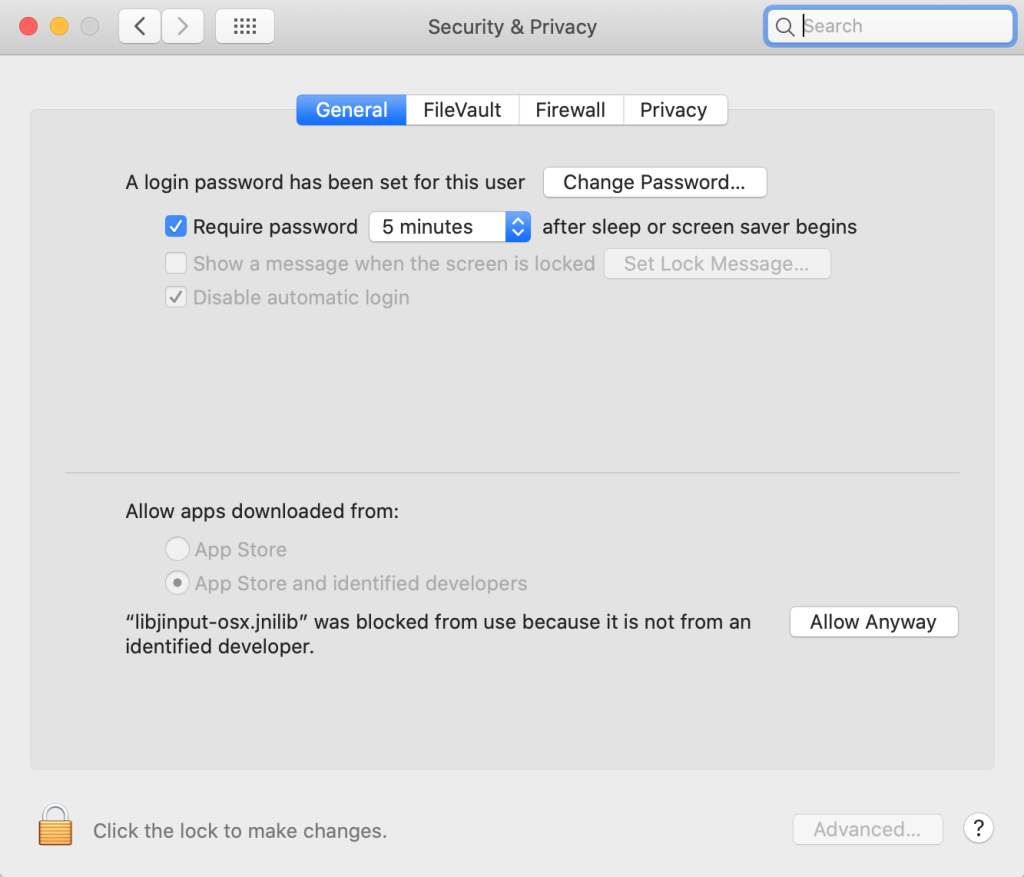
Click the lock in the lower left, enter your Admin password, and then click the Allow Anyway button. Now in a Finder window, go to your PiUtils folder and double click on PiDriverStationOSX.command which will display the following:
Click the Open button and the driver station should start:
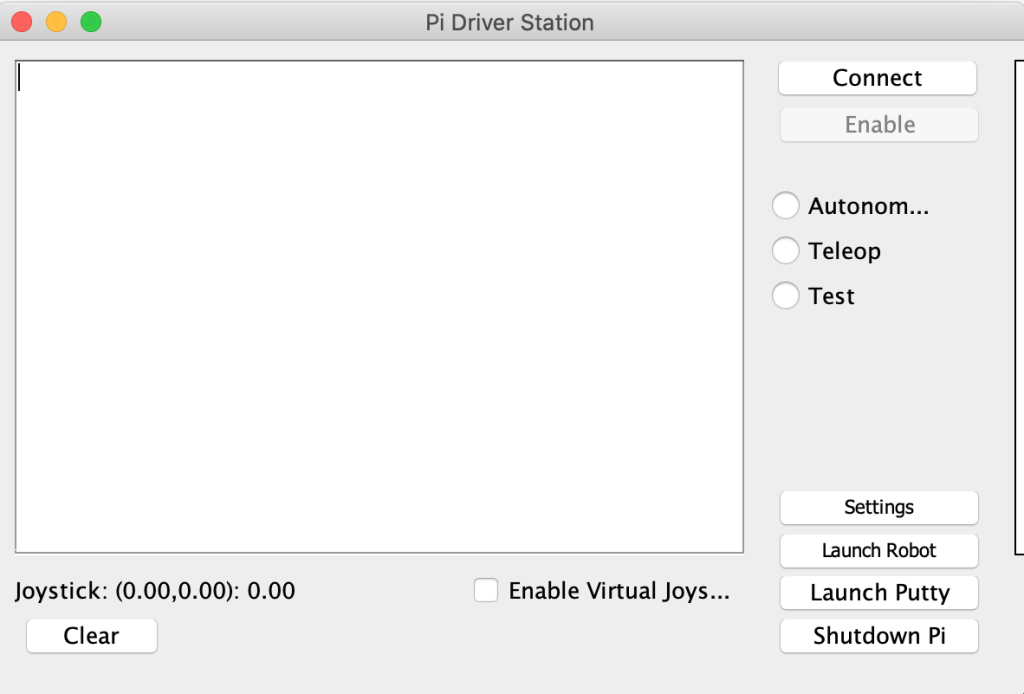
You should now be able to use this Driver Station as described above with the exception that the Launch Putty and Shutdown Pi functions will not work.
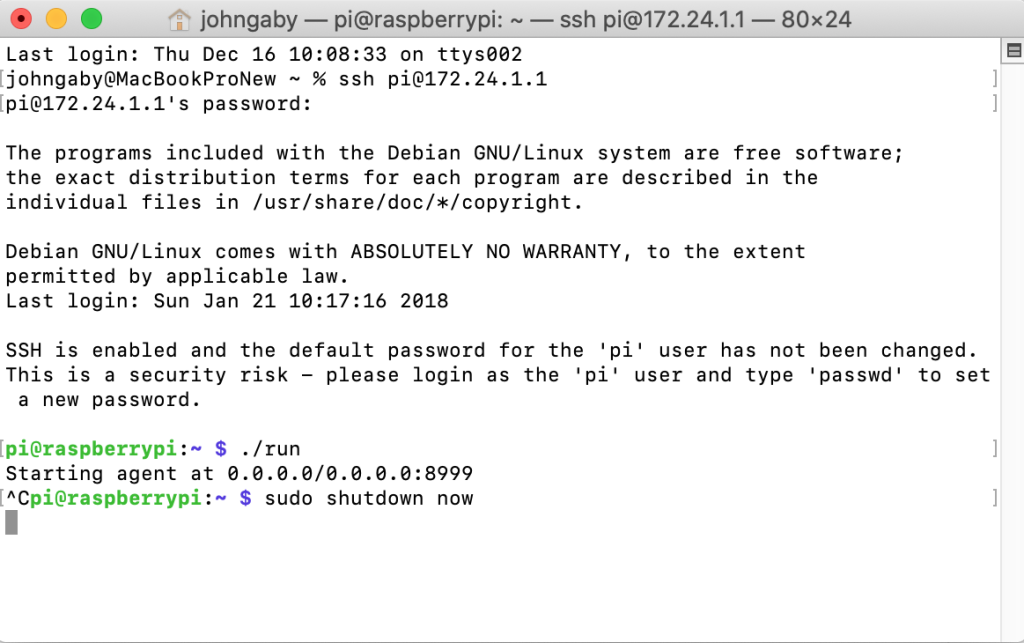
Since PuTTY is a windows application and will not work on your Mac, you will need to start the Remote Client on your pi manually. First, connect your computer’s WiFi to your robot. Then open up a terminal window and type:
|
1 |
ssh pi@172.24.1.1 |
It will then ask you for a password and enter raspberry. Note that when you type the password, the keys you type will not be echoed so you have to type it blind. After you have entered the password, type:
|
1 |
./run |
And you should see:

This program must be running on the pi for anything else to work. At this point you should be able to follow the rest of the directions as described below. However when it comes time to shutdown your pi, you will need to switch back to this terminal window, hold down the control key and press the ‘c’ key. then type:
|
1 |
sudo shutdown now |
as shown below:
Then after 30 seconds or so it is safe to unplug you pi.