This page describes our implementation of Apriltags using a Raspbery Pi 4B. The source code for all of the software described in this article can be found here.
When we implemented Apriltags using a standard 5MP Raspberry Pi camera we had a significant problem with motion blurring when the camera was moving that prevented the decoding of the tags. We went looking for a different camera with a faster shutter speed and came across the OV9281 here. This camera has a maximum capture rate of 144 FPS at 1280×800 resolution, and an adjustable shutter speed which can vary from 8.721 us to 7,456 us. Using this camera we were able to eliminate the motion blurring even when the camera was moving quite fast.
Unfortunately, this camera is not a plug and play replacement for the standard Pi camera and requires the installation of drivers which are a bit tricky to install. If you would like to experiment with this camera we have created a prebuilt Raspberry Pi image which supports the camera which can be found here.
Standard Apriltags Implementation
Here are some of the results we had using this camera with the standard Apriltags implementation. All of the examples are running with 4 threads, a blur of 1, and refine edges. The resolution in all cases is 1280×800.
For a Decimate of 2 we get:
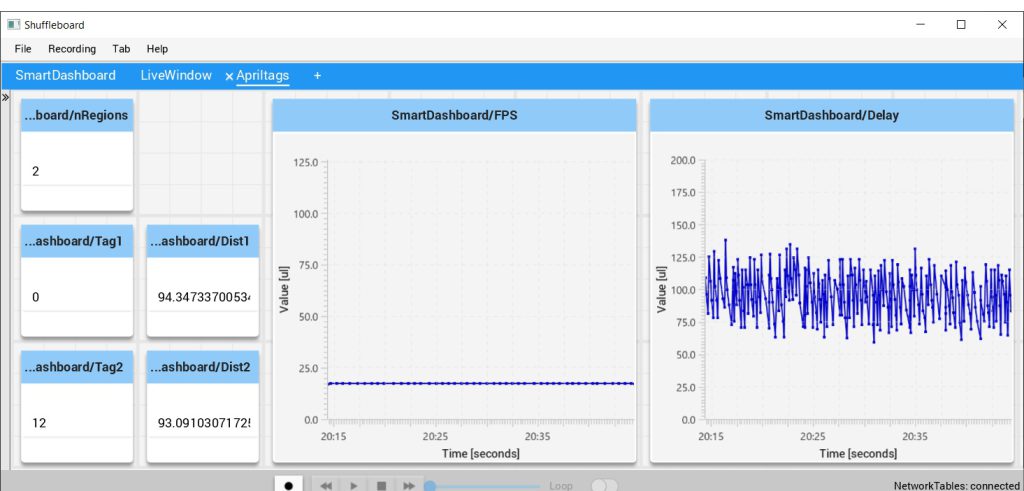
We can see that we get a frame rate of around 20 and a delay of around 90ms. The delay is measured from the time the image was captured until the time it was posted on the Smart Dashboard.
For a Decimate of 4 we get much better performance:
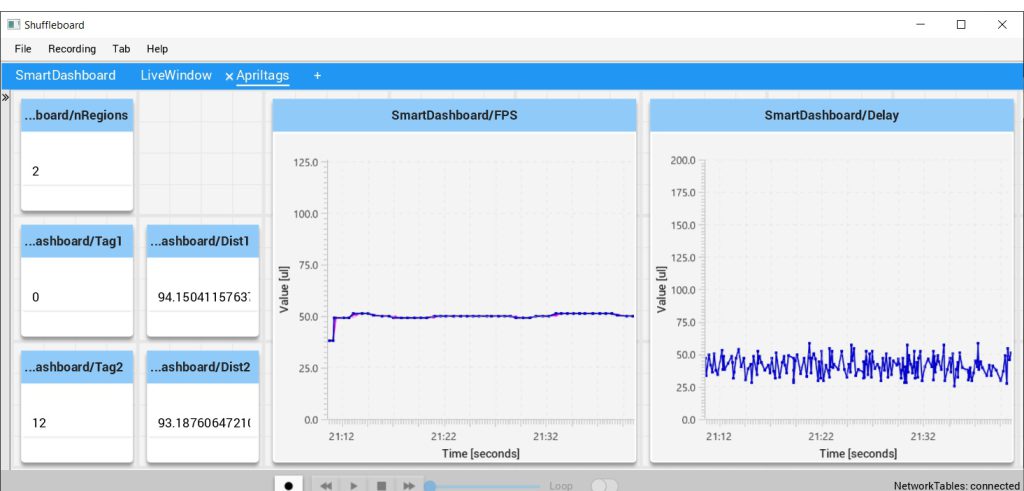
Here we see that we are getting a pretty decent frame rate of about 50, and yet with this Decimate of 4 we still get a decent range.
If we increase the Decimate to 6 we get the following:

Here we get a very nice frame rate of about 75. However with this setting we definitely limit the range of the detection.
Fast Apriltags Implementation
We got to wondering if we took a different approach to decoding the Apriltags whether we could get even better performance. This implementation is definitely a work in progress but we are currently getting the following results. Once again the resolution is 1280×800:
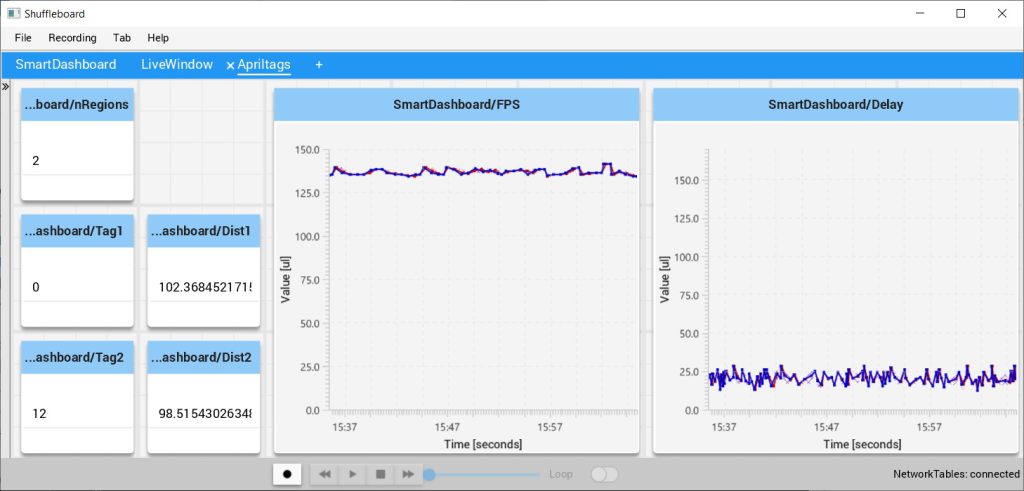
Here we see that we are getting about 135 frames per second with around a 20ms delay. Note that the delay data is being updated in the robotPeriodic function which is only called every 20ms. Capturing the frame data in a thread may deliver an even lower delay.
However, as stated, this is very much a work in progress and we cannot guarantee how well it will work in practice.
Camera Control
Since the camera we are using requires special drivers, we were not able to use it with the very nice PhotonVision tool. Instead, we have created a small java application which we use to control the camera:
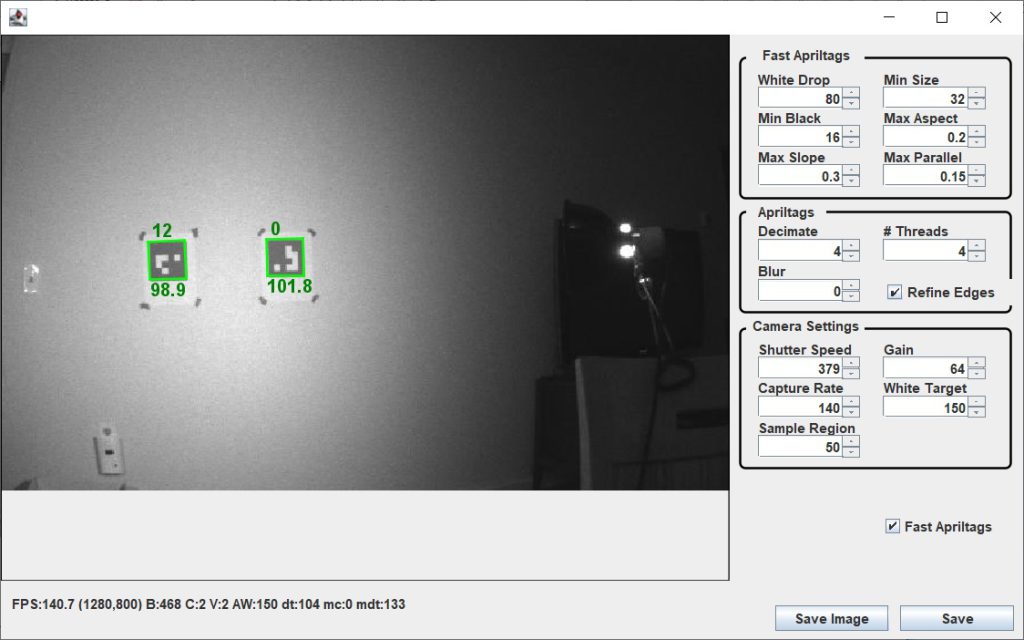
The numbers a the top of the tags are the tag ID. The number at the bottom of the tags is the distance to the center of that tag from the camera, in inches.
The current frame rate and resolution is shown below the camera image.
If the Fast Apriltags checkbox is checked, the experimental fast detection code is used. Otherwise the original Apriltags implementation is used.
The Save Image button will save the current image to the Raspberry Pi. This image can then be loaded into a Visual Studio application (source of which is provided) to help analize any tags which are not being detected properly
The Save button saves all of the parameters to the Raspberry Pi.
Fast Apriltags
This section specifies the parameters which control the Fast Apriltags tag detection:
- White Drop – Specifies the minimum percent drop in pixel value for the detection of black pixels.
- Min Size – Specifies the minimum size of valid tags.
- Min Black – Specifies the minimum number of consecutive black pixels that must be present in a valid tag.
- Max Aspect – Specifies the maximum deviation from a square for a valid tag.
- Max Slope – Specifies the maximum allowable deviation from vertical or horizontal allowed for a valid tag.
- Max Parallel – Specifies the maximum allowable deviation from parallel for the vertical and horizontal sized.
Apriltags
This section specifies the parameters which control the normal Apriltags detection:
- Decimate – Specifies the ‘Decimate’ value to be used.
- # Threads – Specifies the number of threads to be used.
- Blur – Specifies the ‘Sigma’ blurring value to be used.
- Refine Edge – If checked, the edges of the tag are refined.
Camera Settings
This section controls the behavior of the camera:
- Shutter Speed – Specifies the shutter speed to be used in multiples of 8721ns. The value should be between 1 and 855.
- Gain – Specifies the gain to be used. This value should be between 0 and 254. The higher the gain the brighter the image at the expense of more noise.
- Capture Rate – Specifies the rate at which to capture the images. Not that this can be higher than the frame processing rate.
- White Target – If this value is not zero, the Shutter Speed will automatically be adjusted to try and keep the average white value at this number. Note that this function is not available when using the standard Apriltags implementation.
- Sample Region – Specifies the percent of the total image that is to be use when computing the average white value. If this is 100, then the entire image is use. If less than 100 then that fraction of the image is used, centered on the center of the image
Position Tracker
The Position Tracker is a Java application that can be used to display the robot’s position on the field in real time. It connects to a Position Server that runs as part of the FRC robot project:
If a tag is currently visible, the red marker will be displayed. The head of the marker shows the current position and the ‘tail’ indicates the current direction (i.e. in this example the robot is pointed towards the center of the field). The green markers show a history of where the robot has been.
The diagram in the lower left of the image shows the orientation of the x and y axis with respect to the field.
The position history currently allows for 1000 points. If more points than that are generated, points are removed from the beginning of the list to keep the number under 1000. The history can be cleared via the Clear button.
The Position Server that is included in the FRC robot project currently sends a new position two times a second.
Apriltags with a Standard Pi Camera
We also have a version which will work with a standard Pi camera. Although the performance of a Pi camera is significantly less that that of the black and white camera, it does have the advantage of being able to run at a higher resolution. Using the Pi camera at 1080p resolution (1920×1080) we can still get a frame rate of almost 40 FPS. Unfortunately the Pi camera will not work on a Pi image that has had the drivers for the black and white camera installed. For this reason, we have created a separate Pi image for the standard Pi camera which can be found here.
Using the Pi Images
To use the Pi images, you should burn the image on a SD card which is 8 GB or larger. The first time you boot, the file system should automatically be expanded to fit the SD card you have chosen. The images are set up to get their IP address from the robot modem. Once you are connected to the modem you should be able to find the IP by pinging ‘raspberrypi.local’. If all else fails, you can use a tool like Angry IP Scanner to find it.
The pi images are set up to run the capture program automatically. However if you wish to run it manually (so you can see the output), ssh into the pi (usr: pi, pswd: raspberry) and run the command:
|
1 |
./run |
This will kill the version that was run at startup and run the new version in the current terminal.
Updating the Versions Running on the PI
To update the Pi with the most recent version, you have two options.
- Copy the current code from the CodeBlocks folder from github over the /home/pi/CodeBlocks folder on the Pi and then run the make file in the /home/pi/CodeBlocks/apriltagVisionBW or /home/pi/CodeBlocks/apriltagVisionPiCamera folder, depending on which version you are using. You should first run ‘make clean‘ and then ‘make all‘
- If you don’t want to be bothered with building the version, you can copy the prebuilt version ‘apriltagVision‘ from either the apriltagVisionBW or apriltagVisionPiCamera folders from github to either /home/pi/CodeBlocks/apriltagVisionBW/bin/Release or /home/pi/CodeBlocks/apriltagVisionPiCamera/bin/Release depending on which version you are using. You many need to change the permissions after you copy the file.