Our final task is going to be to write a program which will give the robot a way to escape from the following box:
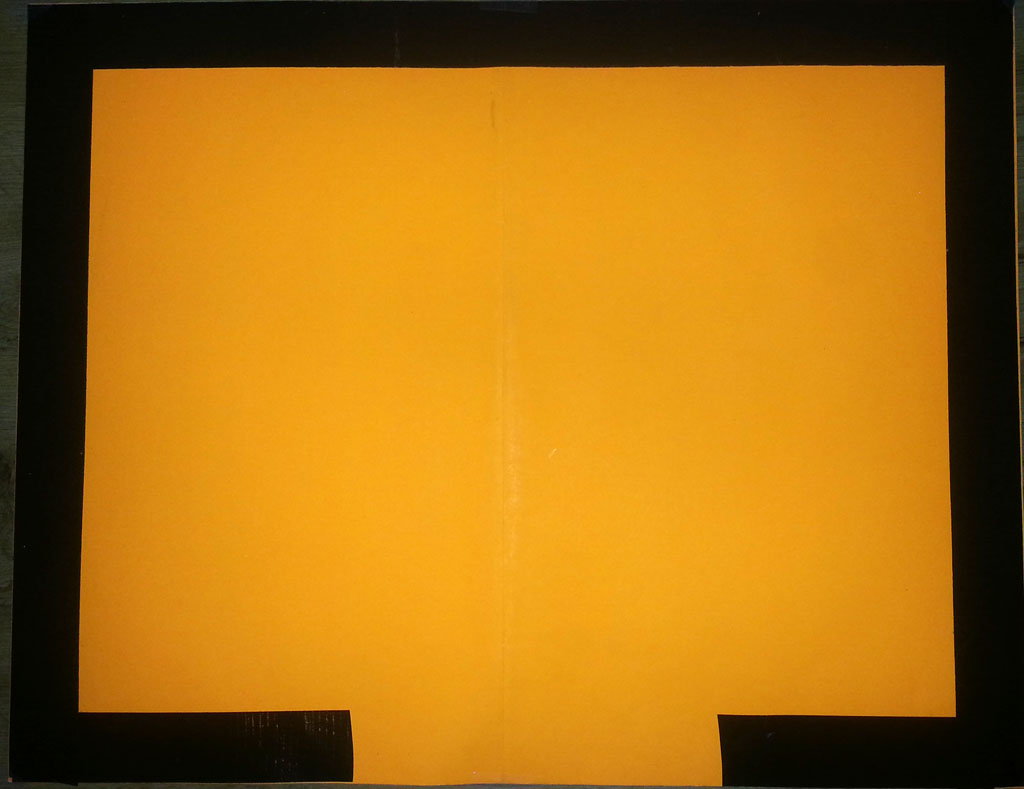
As you can see, there is a black line which surrounds a orange field and this line has a break on one side. Our goal is to be able to place the robot anywhere within the box, pointing at any angle, and have it find its way out without crossing the black line.
Now there are a number of ways that we could approach solving this problem. The one we are going to choose first is relatively simple and, although not the most efficient, involves the use of a state machine which makes it a good exercise.
Basically what we are going to do is to program the robot to drive forward until it ‘sees’ a black line. Then we will have it drive backwards a short distance, turn left or right for a random amount of time and then repeat. Eventually, the robot will be pointed at the exit from which it will make it’s escape.
When implementing a state machine, it is useful to draw a state diagram. The state diagram for our machine looks like:

Now we want to create a command that we will use to implement this state machine. Let’s call that command EscapeCommand. Go ahead and create the framework for the new command. Remember that we are going to need access to the IR Sensor so be sure to include that as one of the arguments for the constructor.
|
1 2 3 4 5 6 7 8 9 10 11 12 13 14 15 16 17 18 19 20 21 22 23 24 25 26 27 28 29 30 31 32 33 34 35 36 37 38 39 40 41 42 43 44 45 46 47 48 49 50 51 52 53 54 55 56 57 58 59 60 61 62 |
/*----------------------------------------------------------------------------*/ /* Copyright (c) 2018-2019 FIRST. All Rights Reserved. */ /* Open Source Software - may be modified and shared by FRC teams. The code */ /* must be accompanied by the FIRST BSD license file in the root directory of */ /* the project. */ /*----------------------------------------------------------------------------*/ package frc.robot.commands; import edu.wpi.first.wpilibj2.command.Command; import frc.robot.subsystems.DriveSubsystem; import robotCore.DigitalInput; import robotCore.Logger; /** * A command to escape from a box. */ public class EscapeCommand extends Command { private final DriveSubsystem m_subsystem; private final DigitalInput m_irSensor; /** * Creates a new EscapeCommand. * * @param subsystem The subsystem used by this command. */ public EscapeCommand(DriveSubsystem subsystem, DigitalInput irSensor) { Logger.log("EscapeCommand", 3, "EscapeCommand()"); m_subsystem = subsystem; m_irSensor = irSensor; // Use addRequirements() here to declare subsystem dependencies. addRequirements(m_subsystem); } // Called when the command is initially scheduled. @Override public void initialize() { Logger.log("EscapeCommand", 2, "initialize()"); } // Called every time the scheduler runs while the command is scheduled. @Override public void execute() { Logger.log("EscapeCommand", -1, "execute()"); } // Called once the command ends or is interrupted. @Override public void end(boolean interrupted) { Logger.log("EscapeCommand", 2, String.format("end(%b)", interrupted)); } // Returns true when the command should end. @Override public boolean isFinished() { Logger.log("EscapeCommand", -1, "isFinished()"); return false; } } |
The first thing we need to do is to create an enum to name our states. We have three states, so our enum will have three values. We also want to declare a variable to hold the current state:
|
1 2 3 4 5 6 7 8 |
public class EscapeCommand extends Command { private enum State { DriveForward, BackUp, Turn } private final DriveSubsystem m_subsystem; private final DigitalInput m_irSensor; private State m_state; |
In the initialize() function, we need to set the state to our starting state DriveForward and start the robot driving forward. Since we will be switching to this state in multiple places we will create a function to do this which we will call from our initialize() function:
|
1 2 3 4 5 6 7 8 9 10 11 12 13 14 15 16 |
private void DriveForward() { Logger.log("EscapeCommand", 2, "DriveForward()"); m_state = State.DriveForward; m_subsystem.setSpeed(k_driveSpeed, k_driveSpeed); } // Called when the command is initially scheduled. @Override public void initialize() { Logger.log("EscapeCommand", 2, "initialize()"); DriveForward(); } |
Note that we have added a Logger call to our DriveForward() function. This will enable us to monitor the progress of our state machine which will be useful if we have any problems with it. We also define the constant k_driveSpeed for the speed so that we can easily change this later if need be:
|
1 |
private static final double k_driveSpeed = 0.4; |
Now in our execute() function we need to add the logic that will switch the robot from one state to another when the time come. We will use a switch statement and create functions to handle each of the three states. First let’s just create the switch with each of the states enumerated:
|
1 2 3 4 5 6 7 8 9 10 11 12 13 14 |
public void execute() { Logger.log("EscapeCommand", -1, "execute()"); switch (m_state) { case DriveForward: break; case BackUp: break; case Turn: break; } } |
Now let’s start with the DriveForward state. Rather than handle the state logic in-line in the switch statement, we are going to create a function to do it for us. It is always good practice to break your program into nice small pieces rather than have one long function that handles a lot of complex tasks.
We will call the function that handles the DriveForward state DrivingForward.
|
1 2 3 4 5 6 7 8 9 10 11 12 13 14 15 16 17 18 19 20 21 |
private void DrivingForward() { } // Called every time the scheduler runs while the command is scheduled. @Override public void execute() { Logger.log("EscapeCommand", -1, "execute()"); switch (m_state) { case DriveForward: DrivingForward(); break; case BackUp: break; case Turn: break; } } |
Now in our DrivingForward() function we need to check to see if the robot has encountered a black line which is the condition for switching out of that state. We are also going to need a timer that we can start so that we can time the backup phase so we declare a Timer variable at the top of our class:
|
1 |
private final Timer m_timer = new Timer(); |
Since we will be using the Timer throughout this command we want to start it in the constructor:
|
1 2 3 4 5 6 7 8 9 10 11 |
public EscapeCommand(DriveSubsystem subsystem, DigitalInput irSensor) { Logger.log("EscapeCommand", 3, "EscapeCommand()"); m_subsystem = subsystem; m_irSensor = irSensor; m_timer.start(); // Use addRequirements() here to declare subsystem dependencies. addRequirements(m_subsystem); } |
Now we can finish the DrivingForward() function:
|
1 2 3 4 5 6 7 8 9 10 11 |
private void DrivingForward() { if (m_irSensor.get()) { Logger.log("EscapeCommand", 2, "BackUp"); m_state = State.BackUp; m_subsystem.setSpeed(-k_driveSpeed, -k_driveSpeed); m_timer.reset(); } } |
First we check to see if the robot ‘sees’ the black line. If so, we need to set the state to BackUp, start the robot moving backwards, and reset the timer we will use to time the backup. We also add a Logger call so that we can, once again, monitor the progress of our state machine in case anything goes wrong:
Next we will handle the BackUp state by adding a function Backing():
|
1 2 3 4 5 6 7 8 9 10 11 12 13 14 15 16 17 18 19 20 21 22 23 24 25 26 27 28 29 30 31 32 33 34 35 36 |
private void Backing() { if (m_timer.get() >= k_backingTime) { Logger.log("EsapeCommand", 2, "Turn"); m_state = State.Turn; if (m_random.nextInt(2) == 1) { m_subsystem.setSpeed(k_turnSpeed, -k_turnSpeed); // Turn right } else { m_subsystem.setSpeed(-k_turnSpeed, k_turnSpeed); // Turn left } m_turnTime = k_minTurnTime + m_random.nextDouble(); m_timer.reset(); } } // Called every time the scheduler runs while the command is scheduled. @Override public void execute() { Logger.log("EscapeCommand", -1, "execute()"); switch (m_state) { case DriveForward: DrivingForward(); break; case BackUp: Backing(); break; case Turn: break; } } |
First we check to see if the time we have been backing up exceeds the backing time limit (which we will define as the constant k_backingTime). If the time has expired then we want enter the Turn state and we want to randomly set the motors to turn the robot either left or right. For this we will need a random number generator and Java provides us with the Random class for this purpose.
Looking at the documentation for the Random class we see that if we call the nextInt(int n) function it will return a random number between zero (inclusive) and n (exclusive). So if we call nextInt(2) we will get either a zero or one. If the result is one, we start the robot turning right, and if it is zero we start it turning left.
We also want to turn for a random amount of time. We see that calling the nextDouble() function of the random number generator will return a value between 0.0 and 1.0. We can add this to a k_minTurnTime to create a turn time between 0.4 and 1.5 seconds. We store this value in a member variable m_turnTime and will use this time to determine when the turn is complete.
Finally, we reset the timer, and log the state change.
We, of course, must declare k_backingTime, k_turnSpeed, k_minTurnTime, m_random, and m_turnTime:
|
1 2 3 4 5 6 7 8 9 10 11 12 13 14 15 |
public class EscapeCommand extends Command { private enum State { DriveForward, BackUp, Turn } private final DriveSubsystem m_subsystem; private final DigitalInput m_irSensor; private State m_state; private static final double k_driveSpeed = 0.4; private final Timer m_timer = new Timer(); private static final double k_backingTime = 0.5; private static final double k_turnSpeed = 0.4; private static final double k_minTurnTime = 0.5; private Random m_random = new Random(System.currentTimeMillis()); private double m_turnTime; |
Note that the constructor for Random takes a long parameter to act as a seed for the random number generator. If we pass in the same number every time, we will get the same string of random numbers (yes, random number generators do not really generate random numbers). By passing in the current time, we can ensure that we get a different sequence of random number each time we run our program.
The final state we need to handle is the Turn state. For this we create the function Turning().
|
1 2 3 4 5 6 7 8 9 10 11 12 13 14 15 16 17 18 19 20 21 22 23 24 25 |
protected void Turning() { if (m_timer.get() >= m_turnTime) { DriveForward(); } } // Called every time the scheduler runs while the command is scheduled. @Override public void execute() { Logger.log("EscapeCommand", -1, "execute()"); switch (m_state) { case DriveForward: DrivingForward(); break; case BackUp: Backing(); break; case Turn: Turning(); break; } } |
Here we simply wait for the calculated time to expire and then switch back to the DriveForward state by calling our previously created DriveForward() function.
At this point your EscapeCommand.java file should look like:
|
1 2 3 4 5 6 7 8 9 10 11 12 13 14 15 16 17 18 19 20 21 22 23 24 25 26 27 28 29 30 31 32 33 34 35 36 37 38 39 40 41 42 43 44 45 46 47 48 49 50 51 52 53 54 55 56 57 58 59 60 61 62 63 64 65 66 67 68 69 70 71 72 73 74 75 76 77 78 79 80 81 82 83 84 85 86 87 88 89 90 91 92 93 94 95 96 97 98 99 100 101 102 103 104 105 106 107 108 109 110 111 112 113 114 115 116 117 118 119 120 121 122 123 124 125 126 127 128 129 130 131 132 133 134 135 136 137 138 139 |
/*----------------------------------------------------------------------------*/ /* Copyright (c) 2018-2019 FIRST. All Rights Reserved. */ /* Open Source Software - may be modified and shared by FRC teams. The code */ /* must be accompanied by the FIRST BSD license file in the root directory of */ /* the project. */ /*----------------------------------------------------------------------------*/ package frc.robot.commands; import java.util.Random; import edu.wpi.first.wpilibj.Timer; import edu.wpi.first.wpilibj2.command.Command; import frc.robot.subsystems.DriveSubsystem; import robotCore.DigitalInput; import robotCore.Logger; /** * A command to escape from a box. */ public class EscapeCommand extends Command { private enum State { DriveForward, BackUp, Turn } private final DriveSubsystem m_subsystem; private final DigitalInput m_irSensor; private State m_state; private static final double k_driveSpeed = 0.4; private final Timer m_timer = new Timer(); private static final double k_backingTime = 0.5; private static final double k_turnSpeed = 0.4; private static final double k_minTurnTime = 0.5; private Random m_random = new Random(System.currentTimeMillis()); private double m_turnTime; /** * Creates a new EscapeCommand. * * @param subsystem The subsystem used by this command. */ public EscapeCommand(DriveSubsystem subsystem, DigitalInput irSensor) { Logger.log("EscapeCommand", 3, "EscapeCommand()"); m_subsystem = subsystem; m_irSensor = irSensor; m_timer.start(); // Use addRequirements() here to declare subsystem dependencies. addRequirements(m_subsystem); } // Called when the command is initially scheduled. private void DriveForward() { Logger.log("EscapeCommand", 2, "DriveForward()"); m_state = State.DriveForward; m_subsystem.setSpeed(k_driveSpeed, k_driveSpeed); } // Called when the command is initially scheduled. @Override public void initialize() { Logger.log("EscapeCommand", 2, "initialize()"); DriveForward(); } private void DrivingForward() { if (m_irSensor.get()) { Logger.log("EscapeCommand", 2, "BackUp"); m_state = State.BackUp; m_subsystem.setSpeed(-k_driveSpeed, -k_driveSpeed); m_timer.reset(); } } private void Backing() { if (m_timer.get() >= k_backingTime) { Logger.log("EsapeCommand", 2, "Turn"); m_state = State.Turn; if (m_random.nextInt(2) == 1) { m_subsystem.setSpeed(k_turnSpeed, -k_turnSpeed); // Turn right } else { m_subsystem.setSpeed(-k_turnSpeed, k_turnSpeed); // Turn left } m_turnTime = k_minTurnTime + m_random.nextDouble(); m_timer.reset(); } } protected void Turning() { if (m_timer.get() >= m_turnTime) { DriveForward(); } } // Called every time the scheduler runs while the command is scheduled. @Override public void execute() { Logger.log("EscapeCommand", -1, "execute()"); switch (m_state) { case DriveForward: DrivingForward(); break; case BackUp: Backing(); break; case Turn: Turning(); break; } } // Called once the command ends or is interrupted. @Override public void end(boolean interrupted) { Logger.log("EscapeCommand", 2, String.format("end(%b)", interrupted)); } // Returns true when the command should end. @Override public boolean isFinished() { Logger.log("EscapeCommand", -1, "isFinished()"); return false; } } |
Now in RobotContainer, connect this new command to button your 8 on the joystick. You RobotContainer.java file should now look like:
|
1 2 3 4 5 6 7 8 9 10 11 12 13 14 15 16 17 18 19 20 21 22 23 24 25 26 27 28 29 30 31 32 33 34 35 36 37 38 39 40 41 42 43 44 45 46 47 48 49 50 51 52 53 54 55 56 57 58 59 60 61 62 63 64 65 66 67 68 69 70 71 72 73 74 75 76 77 78 79 80 81 |
/*----------------------------------------------------------------------------*/ /* Copyright (c) 2018-2019 FIRST. All Rights Reserved. */ /* Open Source Software - may be modified and shared by FRC teams. The code */ /* must be accompanied by the FIRST BSD license file in the root directory of */ /* the project. */ /*----------------------------------------------------------------------------*/ package frc.robot; import edu.wpi.first.wpilibj.XboxController; import edu.wpi.first.wpilibj2.command.Command; import edu.wpi.first.wpilibj2.command.button.CommandJoystick; import frc.robot.commands.DriveForTimeCommand; import frc.robot.commands.DriveToLineCommand; import frc.robot.commands.EscapeCommand; import frc.robot.commands.TestMotorSpeedCommand; import frc.robot.commands.TurnCommand; import frc.robot.commands.ArcadeDriveCommand; import frc.robot.commands.CalibrateSpeedCommand; import frc.robot.commands.DriveCourseCommand; import frc.robot.commands.DriveForDistanceCommand; import frc.robot.subsystems.DriveSubsystem; import frc.robot.subsystems.ExampleSubsystem; import robotCore.DigitalInput; import robotCore.Minibot; /** * This class is where the bulk of the robot should be declared. Since * Command-based is a "declarative" paradigm, very little robot logic should * actually be handled in the {@link Robot} periodic methods (other than the * scheduler calls). Instead, the structure of the robot (including subsystems, * commands, and button mappings) should be declared here. */ public class RobotContainer { // The robot's subsystems and commands are defined here... @SuppressWarnings("unused") private final ExampleSubsystem m_exampleSubsystem = new ExampleSubsystem(); private final DriveSubsystem m_driveSubsystem = new DriveSubsystem(); private final CommandJoystick m_joystick = new CommandJoystick(0); private final DigitalInput m_irSensor = new DigitalInput(Minibot.IRSensor); private final ArcadeDriveCommand m_autoCommand = null; // new ExampleCommand(m_exampleSubsystem); /** * The container for the robot. Contains subsystems, OI devices, and commands. */ public RobotContainer() { m_driveSubsystem.setDefaultCommand(new ArcadeDriveCommand(m_driveSubsystem, m_joystick)); // Configure the button bindings configureButtonBindings(); } /** * Use this method to define your button->command mappings. Buttons can be * created by instantiating a {@link GenericHID} or one of its subclasses * ({@link edu.wpi.first.wpilibj.Joystick} or {@link XboxController}), and then * passing it to a {@link edu.wpi.first.wpilibj2.command.button.JoystickButton}. */ private void configureButtonBindings() { m_joystick.button(1).onTrue(new DriveForTimeCommand(m_driveSubsystem, 0.50, 3.0)); m_joystick.button(2).onTrue(new DriveForDistanceCommand(m_driveSubsystem, 0.75, 30)); m_joystick.button(3).onTrue(new TestMotorSpeedCommand(m_driveSubsystem)); m_joystick.button(4).whileTrue(new CalibrateSpeedCommand(m_driveSubsystem)); m_joystick.button(5).onTrue(new TurnCommand(m_driveSubsystem, 0.3, -180)); m_joystick.button(6).onTrue(new DriveCourseCommand(m_driveSubsystem)); m_joystick.button(7).onTrue(new DriveToLineCommand(m_driveSubsystem, m_irSensor)); m_joystick.button(8).onTrue(new EscapeCommand(m_driveSubsystem, m_irSensor)); } /** * Use this to pass the autonomous command to the main {@link Robot} class. * * @return the command to run in autonomous */ public Command getAutonomousCommand() { // An ExampleCommand will run in autonomous return m_autoCommand; } } |
Now deploy and run your program and watch your robot escape from the box. Note that we currently have no way to detect that the robot has actually escaped, so once it is out, you will need to hit the Disable button on the driver station to stop it.
It would be nice if we added some code to automatically stop the robot once it has escaped. If we were to ensure that there was sufficient white space after the exit (e.g. by putting some white sheets of paper after the exit) then we might be able to use a timer to determine that it had escaped. If we started the timer when we enter the DriveForward state, then in the DrivingForward() function we could check the timer and if it exceeded a certain value we would know that the robot had escaped. We would have to choose a time that it is longer than the longest time the robot would drive if it were still contained (i.e. the time it would take to go from corner to corner). If the time expired while we were driving we would then know the robot was out of the box.
Implementation of this idea is left as an exercise to the student.
This concludes the Minibot tutorial.