Now that we have the ability to control the speed of the motors let’s change our DriveForDistanceCommand so to use speed rather than power to make the robot drive more straight. Open your DriveForDistanceCommand.java file and change the setPower calls to setSpeed calls. Also since we are now using speed rather than power let’s rename the power parameter to speed. The best way to do this is to use VS Studio’s Rename function.
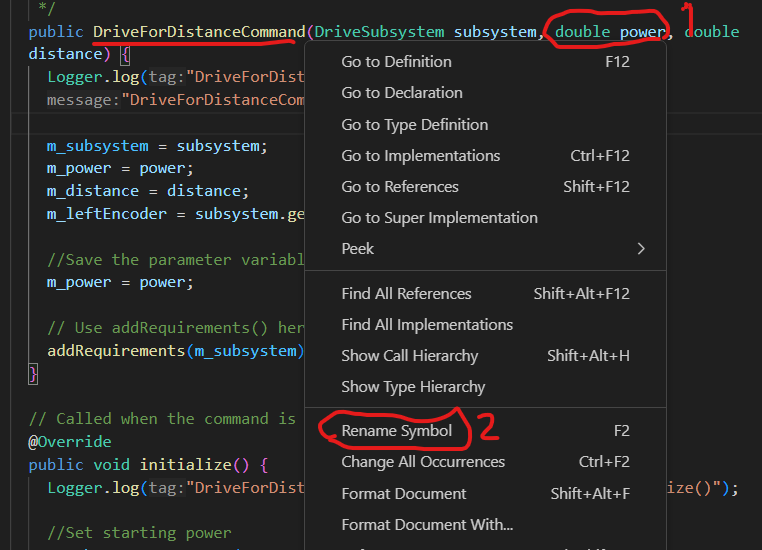
Right click on the parameter power (1) and choose Rename Symbol (2),
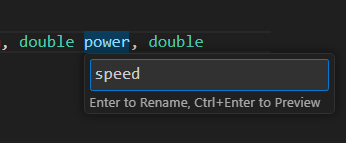
then change the name from power to speed. Note that this changes all instances in your program automatically.
Do the same for the member variable m_power, changing it to m_speed. And update the comments to reflect this, if needed!
Your DriveForDistanceCommand.java file should now look like:
|
1 2 3 4 5 6 7 8 9 10 11 12 13 14 15 16 17 18 19 20 21 22 23 24 25 26 27 28 29 30 31 32 33 34 35 36 37 38 39 40 41 42 43 44 45 46 47 48 49 50 51 52 53 54 55 56 57 58 59 60 61 62 63 64 65 66 67 68 69 70 71 72 73 74 75 76 |
/*----------------------------------------------------------------------------*/ /* Copyright (c) 2018-2019 FIRST. All Rights Reserved. */ /* Open Source Software - may be modified and shared by FRC teams. The code */ /* must be accompanied by the FIRST BSD license file in the root directory of */ /* the project. */ /*----------------------------------------------------------------------------*/ package frc.robot.commands; import edu.wpi.first.wpilibj2.command.Command; import frc.robot.subsystems.DriveSubsystem; import robotCore.Encoder; import robotCore.Logger; /** * A command to drive a fixed distance. */ public class DriveForDistanceCommand extends Command { private final DriveSubsystem m_subsystem; private final double m_speed; // motor speed percent. 0.0 to 1.0 private final double m_distance; private final Encoder m_leftEncoder; /** * Creates a new DriveForDistanceCommand. * * @param subsystem The subsystem used by this command. */ public DriveForDistanceCommand(DriveSubsystem subsystem, double speed, double distance) { Logger.log("DriveForDistanceCommand", 3, "DriveForDistanceCommand()"); m_subsystem = subsystem; // Save the parameter variables for motor power and run time m_speed = speed; m_distance = distance; m_leftEncoder = m_subsystem.getLeftEncoder(); // Use addRequirements() here to declare subsystem dependencies. addRequirements(m_subsystem); } // Called when the command is initially scheduled. @Override public void initialize() { Logger.log("DriveForDistanceCommand", 2, "initialize()"); m_subsystem.setPower(m_speed, m_speed); // Reset Encoder before using m_leftEncoder.reset(); } // Called every time the scheduler runs while the command is scheduled. @Override public void execute() { Logger.log("DriveForDistanceCommand", -1, "execute()"); } // Called once the command ends or is interrupted. @Override public void end(boolean interrupted) { Logger.log("DriveForDistanceCommand", 2, String.format("end(%b)", interrupted)); m_subsystem.stop(); } // Returns true when the command should end. @Override public boolean isFinished() { Logger.log("DriveForDistanceCommand", -1, "isFinished()"); return (m_leftEncoder.get() >= m_distance); } } |
Now if you deploy and run the code (remember that this command is tied to joystick button 2), you will see that once the robot gets going, it drives pretty straight. However while it is starting up, it may turn a little bit. This is because, as we saw from the speed graphs in the previous chapter, that the motors do not start up quite in sync. What we want is a way to measure if the robot has turned and compensate the power so that it drives in a straight line.
To do this, we are going to change our DriveForDistanceCommand to use both the left and right encoders to keep the robot driving straight. Currently we are only using the left encoder to measure the distance the robot has traveled, so we need access to the right encoder.
Add a declaration for m_rightEncoder and initialize it in the constructor:
|
1 2 3 4 5 6 7 8 9 10 11 12 13 14 15 16 17 18 19 20 |
public class DriveForDistanceCommand extends Command { private final DriveSubsystem m_subsystem; private double m_speed; private double m_distance; private Encoder m_leftEncoder; private Encoder m_rightEncoder; /** * Creates a new DriveForDistanceCommand. * * @param subsystem The subsystem used by this command. */ public DriveForDistanceCommand(DriveSubsystem subsystem, double speed, double distance) { Logger.log("DriveForDistanceCommand", 3, "DriveForDistanceCommand()"); m_subsystem = subsystem; m_speed = speed; m_distance = distance; m_leftEncoder = subsystem.getLeftEncoder(); m_rightEncoder = subsystem.getRightEncoder(); |
In the initialize() function we need to reset the right encoder:
|
1 2 3 4 5 6 7 8 9 |
public void initialize() { Logger.log("DriveForDistanceCommand", 2, "initialize()"); m_subsystem.setSpeed(m_speed, m_speed); // Reset Encoder before using m_leftEncoder.reset(); m_rightEncoder.reset(); } |
Now in the execute() function we are going to adjust the speed of the motors to keep the robot driving straight. The first thing we want to do is to get the current left and right encoder values and compute the difference between the two:
|
1 2 3 4 5 6 7 |
public void execute() { Logger.log("DriveForDistanceCommand", -1, "execute()"); int leftDistance = m_leftEncoder.get(); int rightDistance = m_rightEncoder.get(); int deltaDistance = rightDistance - leftDistance; } |
If the robot is driving straight, deltaDistance should be zero because the left and right wheels have turned by the same amount. It is, therefore, our goal to keep this deltaDistance as close to zero as we can at all times. If deltaDistance is positive, then this means that the right wheel has turned farther than the left and we need to slow it down and speed up the left. Conversely, if deltaDistance is negative then the left wheel is running too fast and we need to slow it down and speed up the right. Conceptually we want to subtract the deltaDistance from the speed of the right motor and add it to the speed of the left motor. Something like:
|
1 2 |
**** First cut! Do not add this line to your code! **** m_subsystem.setSpeed(m_speed + deltaDistance, m_speed - deltaDistance); |
But remember that speed should be in the range of -1.0 to +1.0. So if the difference between the left and right distance is greater than or equal to one, it will slam the robot to the left or right at full power which is not what we want.
To prevent this, we scale the deltaDistance by some fractional constant. Let’s start with a scale factor of 0.005:
|
1 |
m_subsystem.setSpeed(m_speed + deltaDistance * k_scale, m_speed - deltaDistance * k_scale); |
Once again we are defining the scale factor as a constant k_scale which we define as follows:
|
1 2 3 4 5 6 7 8 |
public class DriveForDistanceCommand extends Command { private final DriveSubsystem m_subsystem; private double m_speed; private double m_distance; private Encoder m_leftEncoder; private Encoder m_rightEncoder; private static final double k_scale = 0.005; |
The completed execute() function should now look like:
|
1 2 3 4 5 6 7 8 9 |
public void execute() { Logger.log("DriveForDistanceCommand", -1, "execute()"); int leftDistance = m_leftEncoder.get(); int rightDistance = m_rightEncoder.get(); int deltaDistance = rightDistance - leftDistance; m_subsystem.setSpeed(m_speed + deltaDistance * k_scale, m_speed - deltaDistance * k_scale); } |
Your DriveForDistanceCommand.java file should now look like:
|
1 2 3 4 5 6 7 8 9 10 11 12 13 14 15 16 17 18 19 20 21 22 23 24 25 26 27 28 29 30 31 32 33 34 35 36 37 38 39 40 41 42 43 44 45 46 47 48 49 50 51 52 53 54 55 56 57 58 59 60 61 62 63 64 65 66 67 68 69 70 71 72 73 74 75 76 77 78 79 80 81 82 83 84 85 86 |
/*----------------------------------------------------------------------------*/ /* Copyright (c) 2018-2019 FIRST. All Rights Reserved. */ /* Open Source Software - may be modified and shared by FRC teams. The code */ /* must be accompanied by the FIRST BSD license file in the root directory of */ /* the project. */ /*----------------------------------------------------------------------------*/ package frc.robot.commands; import edu.wpi.first.wpilibj2.command.Command; import frc.robot.subsystems.DriveSubsystem; import robotCore.Encoder; import robotCore.Logger; /** * A command to drive a fixed distance. */ public class DriveForDistanceCommand extends Command { private final DriveSubsystem m_subsystem; private final double m_speed; // motor power percent. 0.0 to 1.0 private final double m_distance; private Encoder m_leftEncoder; private Encoder m_rightEncoder; private static final double k_scale = 0.005; /** * Creates a new DriveForDistanceCommand. * * @param subsystem The subsystem used by this command. */ public DriveForDistanceCommand(DriveSubsystem subsystem, double speed, double distance) { Logger.log("DriveForDistanceCommand", 3, "DriveForDistanceCommand()"); m_subsystem = subsystem; // Save the parameter variables for motor power and run time m_speed = speed; m_distance = distance; m_leftEncoder = m_subsystem.getLeftEncoder(); m_rightEncoder = subsystem.getRightEncoder(); // Use addRequirements() here to declare subsystem dependencies. addRequirements(m_subsystem); } // Called when the command is initially scheduled. @Override public void initialize() { Logger.log("DriveForDistanceCommand", 2, "initialize()"); m_subsystem.setSpeed(m_speed, m_speed); // Reset Encoder before using m_leftEncoder.reset(); m_rightEncoder.reset(); } // Called every time the scheduler runs while the command is scheduled. @Override public void execute() { Logger.log("DriveForDistanceCommand", -1, "execute()"); int leftDistance = m_leftEncoder.get(); int rightDistance = m_rightEncoder.get(); int deltaDistance = rightDistance - leftDistance; m_subsystem.setSpeed(m_speed + deltaDistance * k_scale, m_speed - deltaDistance * k_scale); } // Called once the command ends or is interrupted. @Override public void end(boolean interrupted) { Logger.log("DriveForDistanceCommand", 2, String.format("end(%b)", interrupted)); m_subsystem.stop(); } // Returns true when the command should end. @Override public boolean isFinished() { Logger.log("DriveForDistanceCommand", -1, "isFinished()"); return (m_leftEncoder.get() >= m_distance); } } |
Now deploy and run your program. You should see that the robot does a better job of driving straight. The size of the k_scale factor will control how quickly the robot corrects it’s direction. Like we did with the PID tuning for the drive motors, we would like k_scale to be as large as possible without creating any instability. In my case I was able to increase above the initial 0.005 introduces some instability.
There are other mechanisms that you can use to keep your robot driving in a particular direction. For example, if your robot has a gyroscope sensor which reports it current orientation, you can use that sensor in a similar manner to drive a straight line. You would adjust the left and right motor speeds based on how far the robot is deviating from the desired direction. This mechanism has the advantage on not being affected by any wheel slippage that might occur, which would cause errors when using our wheel encoder method.
Before we move on, let’s make one more change to our DriveForDistanceCommand. Specifying the distance in encoder units is OK, but it would really be nice if we could use real world units like inches instead. To do that we will need to compute a conversion factor that will convert inches into the encoder units.
Set the robot up to run the DriveForDistanceCommand again, but this time put a piece of tape on the floor to mark it’s starting position. Then run your program and mark the position where the robot ends and measure the distance it traveled using a tape measure.
You should find that the robot moves about 16.0 inches. This means that 2000 encoder units is equal to 16.0 inches. We want to pass in the distance in inches (because those are distance units we all understand), so in the code we will need to multiply desired inches by (2000/16.0) to get encoder units (needed to command the Encoder/Motor objects) . Change the DriveForDistanceCommand constructor to perform this calculation:
|
1 2 3 4 5 6 7 8 9 10 11 12 |
public DriveForDistanceCommand(DriveSubsystem subsystem, double speed, double distance) { Logger.log("DriveForDistanceCommand", 3, "DriveForDistanceCommand()"); m_subsystem = subsystem; m_speed = speed; m_distance = distance * k_ticksPerInch; m_leftEncoder = subsystem.getLeftEncoder(); m_rightEncoder = subsystem.getRightEncoder(); // Use addRequirements() here to declare subsystem dependencies. addRequirements(m_subsystem); } |
Where, in we defined k_ticksPerInch as:
|
1 |
private static final double k_ticksPerInch = 2000 / 16.0; |
Finally change your RobotContainer.java file to specify that the robot drive for 30 inches when button 2 is pressed, and give it a try.
|
1 2 3 4 5 6 |
private void configureButtonBindings() { m_joystick.button(1).onTrue(new DriveForTimeCommand(m_driveSubsystem, 0.50, 3.0)); m_joystick.button(2).onTrue(new DriveForDistanceCommand(m_driveSubsystem, 0.75, 30)); m_joystick.button(3).onTrue(new TestMotorSpeedCommand(m_driveSubsystem)); m_joystick.button(4).whileTrue(new CalibrateSpeedCommand(m_driveSubsystem)); } |
One final note. This command, as written, will only drive the robot forward. If you attempt to drive backwards by setting the speed negative, you will find the robot never stops. It is left as an exercise for the reader to fix the program so that it can successfully drive either forward or backward.