Now that we have all of the pieces working the next step is to start working on making the robot operate autonomously. One of the important steps in doing is is to find a way to keep track of the robot’s position and orientation on the field. Once we have done that we can command the robot to move along precise paths without operator intervention.
The Odometry works by keeping track of the orientation of each of the drive wheel and the amount each wheel has turned. Every 20 ms these numbers are read and using some fairly complex math, the direction and distance that the robot moved during those 20 ms can be computed. By adding these changes up over time the absolute position of the robot can be determined.
This technique is often referred to as Dead Reconning. The achilleas heel of this technique is each of these measurements has a slight error associated with it and this error accumulates over time. So the longer the robot drives, the less certain we are of it’s position. This can be countered if we have some other way to measure the position of the robot. For this we will be using a camera and markers called Apriltags.
For now, we will concentrate on using the Odometry. As I said, the calculations are fairly complex, but, fortunately, these calculations are preformed for us via wpilib. The class we will be using is called SwerveDrivefPoseEstimator. Since the Gyro and wheel Encoders are part of the DriveSubsystem, we will be declaring an instance of this class in the DriveSubsystem as follows:
|
1 2 3 4 5 6 7 |
private SwerveDrivePoseEstimator m_poseEstimator; ... m_poseEstimator = new SwerveDrivePoseEstimator(m_kinematics, m_gyro.getRotation2d(), getModulePositions(), new Pose2d(1, 1, Rotation2d.fromDegrees(0))); |
The constructor for SwerveDrivePoseEstimator take the Kinimatics (which we have already defined), the current Gyro reading, the positions for all four modules and the current robot’s pose. For the initial pose we are going to arbitrarily choose (1, 1) at an angle of 0 degrees. Later when we add the camera, this pose will be corrected using the Apriltags.
Since we must pass in an array which contains the current SwerveModule positions for all four modules, we will need a function to compute that:
|
1 2 3 4 5 6 7 8 9 10 11 |
private final SwerveDriveKinematics m_kinematics = new SwerveDriveKinematics( m_frontLeftLocation, m_frontRightLocation, m_backLeftLocation, m_backRightLocation); private SwerveModulePosition[] getModulePositions() { return new SwerveModulePosition[] { m_frontLeft.getPosition(), m_frontRight.getPosition(), m_backLeft.getPosition(), m_backRight.getPosition() }; } |
Note that the order of the modules returned must match the order in which they are defined when we create the SwerveDriveKinimatics instance.
This function calls a function getPosition in the SwerveModule to obtain the current position for each module.
|
1 2 3 4 5 6 7 |
public double getDrivePositionInMeters() { return getDrivePosition() / DriveSubsystem.k_ticksPerMeter; } public SwerveModulePosition getPosition() { return new SwerveModulePosition(getDrivePositionInMeters(), getSteeringPositionRotation2d()); } |
Now we must periodically calculate the robot’s position using the current gyro angle and wheel positions. We do this by adding the following the the periodic function of the DriveSubsystem:
|
1 |
m_poseEstimator.updateWithTime(ApriltagsCamera.getTime(), m_gyro.getRotation2d(), getModulePositions()); |
Now we are ready to try this out. To see if it is working we could simply print out the robots position and angle and drive it around and compare the output to the actual robot’s position. However, as this would be quite tedious, we will use a better solution.
The Apriltags class (which we will be using later when we add the camera) has a built in server which can transmit the robot’s pose to a program which we will run on the laptop. This program will then display the current robot pose graphically so we can see where it is at any time.
Do use this feature we need to create an instance of the ApriltagsCamera and the PositionServer in our DriveSubsystem class.
|
1 2 |
private ApriltagsCamera m_camera = new ApriltagsCamera(); private final PositionServer m_posServer = new PositionServer(m_camera); |
You should then start the server with a call to:
|
1 |
m_posServer.start(); |
An then in the periodic function we can update the PositionServer with the current robot’s pose:
|
1 |
m_posServer.setPosition(m_poseEstimator.getEstimatedPosition()); |
You will find the Position Viewer app in the Utils directory of RobotTools2024. Start your program and then start the Position Viewer by double clicking on the PositionViewer.cmd file in the Utils folder. Then drive your robot around a bit and you will find it’s path displayed by the Position Viewer:
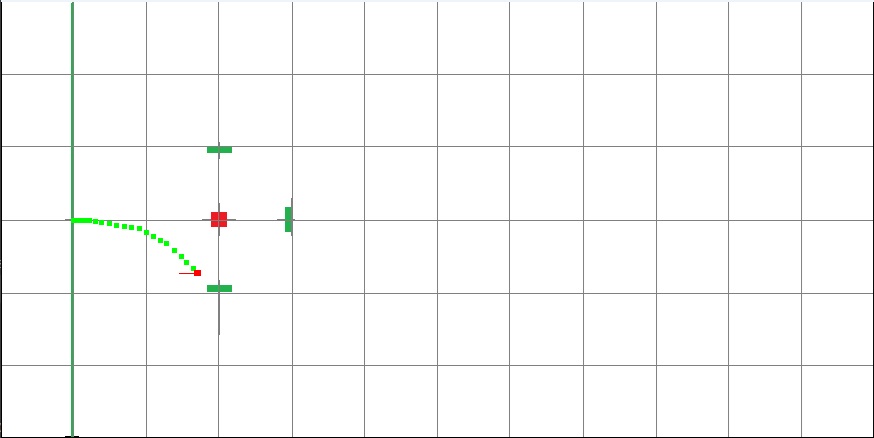
The current position of the robot is shown by the red square and it position history is shown bye the green dots.